เนื้อหาต่อไปนี้จะเป็นตอนต่อจากตอนที่แล้ว ที่เราดูถึงเรื่องของการใช้งาน FormGroup
จะเห็นการใช้งานของ FormControl ในตอนที่แล้ว มี FormControl แค่ตัวเดียว
"ทบทวนบทความได้ที่"
การใช้งาน Reactive Form ด้วย FormBuilder ใน Angular
https://www.ninenik.com/content.php?arti_id=793 via @ninenik
ในบทความตอนนี้เราจะเพิ่ม FormControl มากกว่าหนึ่ง เข้าไปใช้งานใน FormGroup
โดยที่จากรูปแบบตัวอย่างตอนที่แล้ว เราพูดถึงรายชื่อ staff หรือพนักงานของบริษัท มีการใช้งานเฉพาะ
ส่วนของชื่อหรือ name เท่านั้น ซึ่งจริงๆ ข้อมูลพนักงานก็ต้องมีมากกว่านั้น จุดนี้เราจึงจะสร้างชุด
ข้อมูลหรือแบบจำลองข้อมูลของ staff มาประกอบการทำความเข้าใจกับ Reactive Form โดยก่อนอื่น
ให้เราสร้างไฟล์ data-model.ts ไว้ในโฟลเดอร์ components เพื่อเป็นแบบจำลองข้อมูลพนักงาน ดังนี้
ไฟล์ data-model.ts
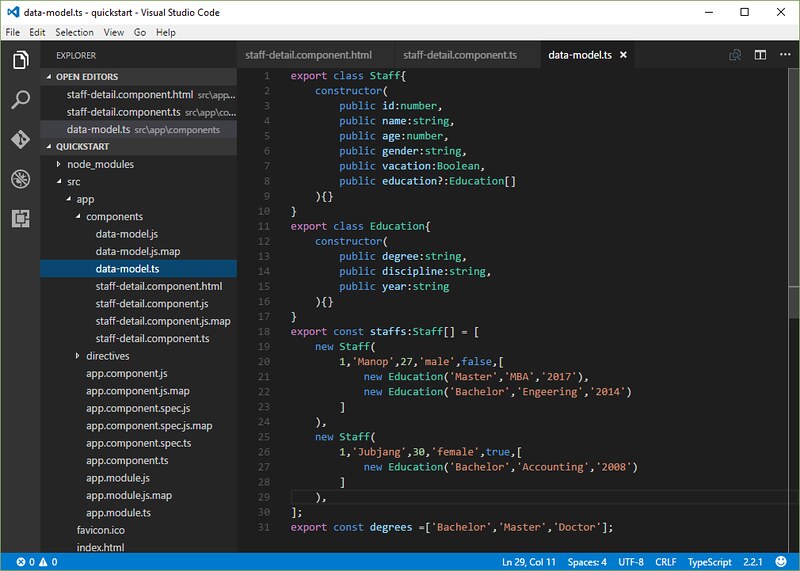
export class Staff{
    constructor(
        public id:number,
        public name:string,
        public age:number,
        public gender:string,
        public vacation:Boolean,
        public education?:Education[]
    ){}
}
export class Education{
    constructor(
        public degree?:string,
        public discipline?:string,
        public year?:string
    ){}
}
export const staffs:Staff[] = [
    new Staff(
        1,'Manop',27,'male',false,[
            new Education('Master','MBA','2017'),
            new Education('Bachelor','Engeering','2014')
        ]
    ),
    new Staff(
        1,'Jubjang',30,'female',true,[
            new Education('Bachelor','Accounting','2008')
        ]
    ),
];
export const degrees =['Bachelor','Master','Doctor'];
รูปแบบข้อมูลด้านบนจะใช้ประกอบในการใช้งาน reactive form component เพื่อทำการแก้ไขรายละเอียดของ
staff จากโค้ดด้านบน เราจำเป็นต้องมี Staff class และ รายละเอียดข้อมูลรายชื่อของ staff
ไฟล์ข้างต้นจะส่งออก class 2 ค่า และ ค่าตัวแปรคงที่อีก 2 ค่า
Staff และ Education class จะกำหนดรูปแบบของข้อมูลใน App
staffs และ degrees เป็นค่าคงที่ของข้อมูลสำหรับทดสอบ
ขออธิบายเกี่ยวกับข้อมูลคร่าวๆ ดังนี้ staff แต่ละคนจะมี
id,name,age,gender เพศ ,vacation พักร้อนอยู่หรือไม่,education ระดับการศึกษา
และในระดับการศึกษาก็มีรูปแบบข้อมูลที่ประกอบไปด้วย
degree ระดับการศึกษา, discipline สาขาวิชาที่จบ , year ปีที่จบ
ส่วน staffs เป็นค่าคงที่ข้อมูลสำหรับทดสอบ เป็นราชื่อของพนักงานมีรูปแบบของข้อมูล
ภายในตามรูปแบบที่อธิบายด้านบน
degrees เป็นค่าคงที่ข้อมูลสำหรับทดสอบ เป็นระดับการศึกษ ปริญญาตรี ปริญญาโท และ ปริญญาเอก
ตอนนี้ชุดแบบจำลองข้อมูลเราพร้อมแล้ว ต่อไปเราจะเพิ่ม FormControl ให้สอดคล้องกับข้อมูลตัวอย่าง
การเพิ่ม FormControl เข้ามาใช้งานใน Reactive Form
เราจำเป็นต้องใช้ค่า degrees มากำหนดใน <select> element เพื่อให้ สามารถเลือกระดับการศึกษา
ได้ ดังนั้นเราต้องทำการ import ชุดแบบจำลองข้อมูลมาใช้งาน และกำหนด FormControl เพิ่มเข้าไป
เป็นดังนี้
ไฟล์ staff-detail.component.ts

import { Component } from '@angular/core';
import { FormBuilder, FormGroup, Validators } from '@angular/forms';

import { degrees } from './data-model';

@Component({
  selector: 'staff-detail',
  templateUrl:'/app/components/staff-detail.component.html'
})
export class StaffDetailComponent  {
  staffForm: FormGroup;
  degrees = degrees;

  constructor(private fb: FormBuilder) {
    this.createForm();
  }

  createForm() {
    this.staffForm = this.fb.group({
      name: ['',Validators.required],
      degree:'',
      discipline:'',
      year:'',
      age: '',
      gender: '',
      vacation: ''
    });
  }

}
จากนั้นให้แก้ไขไฟล์ template ให้สอดคล้องกับ FormControl ดังนี้
ไฟล์ staff-detail.component.html
<h2>Staff Detail</h2>
<h3><i>A FormGroup with multiple FormControls</i></h3>
<form [formGroup]="staffForm" novalidate>
  <div class="form-group">
    <label class="center-block">Name:
      <input class="form-control" formControlName="name">
    </label>
  </div>
  <div class="form-group">
    <label class="center-block">Degree:
      <select class="form-control" formControlName="degree">
          <option *ngFor="let degree of degrees" [value]="degree">{{degree}}</option>
      </select>
    </label>
  </div>
  <div class="form-group">
    <label class="center-block">Discipline:
      <input class="form-control" formControlName="discipline">
    </label>
  </div>
  <div class="form-group">
    <label class="center-block">Year:
      <input class="form-control" formControlName="year">
    </label>
  </div>
  <div class="form-group">
    <label class="center-block">Age:
      <input class="form-control" formControlName="age">
    </label>
  </div>
  <div class="form-group radio">
    <h4>Gender:</h4>
    <label class="center-block"><input type="radio" formControlName="gender" value="male">Male</label>
    <label class="center-block"><input type="radio" formControlName="gender" value="female">Female</label>
  </div>
  <div class="checkbox">
    <label class="center-block">
      <input type="checkbox" formControlName="vacation">I have a vacation.
    </label>
  </div>
</form>
<p>Form value: {{ staffForm.value | json }}</p>
<p>Form status: {{ staffForm.status | json }}</p>
จากรูปแบบ template ใหม่ข้างต้น เรามีการใช้งานทั้ง input box , select box สำหรับ "degree" , radio buttton
สำหรับ "gender" และ checkbox สำหรับ "vacation"
สังเกตส่วนของ select box เราจะต้องทำการเชื่อมโยง "value" property ให้มีค่าเท่ากับ "degree" ด้วย ไม่เช่น
นั้น select box จะแสดงเป็นรายการแรกของชุดแบบจำลองข้อมูลทดสอบ
ในไฟล์ component class เรากำหนด control property ต่างๆ โดยไม่ต้องสนใจว่าแต่ละส่วนนั้นเป็นอะไรใน template
อย่างเชนเรากำหนด "degree", "gender" และ "vacation" control ในรูปแบบเดียวกับที่เรากำหนดใน "name" control
แล้วนำ control property แต่ละไปกำหนดใน template HTML element โดยใช้ FormControl name ร่วมกับ
formControlName directive
ในรูปแบบ
formControlName="ชื่อ FormControl"
ตัวอย่างเช่น
formControlName="degree"
ผลลัพธ์ที่ได้ เราจะได้โครงสร้างข้อมูลของ staffForm.value เป็นดังนี้
Form value: {
  "name": "",
  "degree": "",
  "discipline": "",
  "year": "",
  "age": "",
  "gender": "",
  "vacation": ""
}
การจัดกลุ่มให้กับ FormGroup
เมื่อฟอร์มของเรามีขนาดใหญ่ขึ้น เราสามารถที่จะทำการจัดกลุ่มให้กับ FormControl ที่มีความเกี่ยวข้องหรือสัมพันธ์
กันไว้ใน FormGroup ได้ เช่น "degree" , "discipline" และ "year" เราสามารถกำหนดไว้ในกลุ่ม "education"
FormGroup การจัดการด้วยวิธีการจัดกลุ่มในลักษณะนี้จะทำให้เราเห็นภาพโครงสร้างลำดับขั้นของรูปแบบข้อมูลจำลอง
ได้ และยังช่วยให้สามารถติดตามการตรวจสอบความถูกต้องของข้อมูลและสภาวะความสัมพันธ์ของกลุ่ม control อีกด้วย
เราได้เคยใช้ "FormBuilder" สร้าง "FormGroup" มาแล้วรอบหนึ่ง และกำหนดในชื่อว่า "staffForm" ให้เป็น
"FormGroup" หลัก จากนั้นเราก็ใช้ "FormBuilder" อีกครั้งในการสร้าง "FormGroup" ย่อย ไส่ไว้ใน "education"
property ของ "FormGroup" หลักอีกทอดหนึ่ง เราจะได้รุปแบบการจัดกลุ่มให้กับ FormGroup เป็นดังนี้
ไฟล์ staff-detail.component.ts
import { Component } from '@angular/core';
import { FormBuilder, FormGroup, Validators } from '@angular/forms';

import { degrees } from './data-model';

@Component({
  selector: 'staff-detail',
  templateUrl:'/app/components/staff-detail.component.html'
})
export class StaffDetailComponent  {
  staffForm: FormGroup;
  degrees = degrees;

  constructor(private fb: FormBuilder) {
    this.createForm();
  }

  createForm() {
    this.staffForm = this.fb.group({// <-- the parent FormGroup
      name: ['',Validators.required],
      education: this.fb.group({ // <-- the child FormGroup
        degree: '',
        discipline: '',
        year: ''
      }),
      age: '',
      gender: '',
      vacation: ''
    });
  }

}
ตอนนี้เราได้เปลี่ยนโครงสร้างของ form control ใน component class แล้ว ดังนั้นเราต้องแก้ไขส่วนของ template
ให้สอดคล้องกันด้วย โดยในไฟล์ staff-detail.component.html ให้ทำการครอบส่วนของ education FormControl
ไว้ใน <div> จากนั้นกำหนด "formGroupName" directive เข้าไปใน <div> นั้น และให้มีการเชื่อมโยงกับ "education"
property ของ "FormGroup" ย่อย ดังนี้
เพื่อให้เห็นส่วนของ eduction ได้ชัดเจนขึ้น ให้เราเพิ่ม <h4> ใส่ หัวข้อว่า Educaton จะได้ไฟล์
staff-detail.component.html เป็นดังนี้
ไฟล์ staff-detail.component.html
<h2>Staff Detail</h2>
<h3><i>A FormGroup with multiple FormControls</i></h3>
<form [formGroup]="staffForm" novalidate>
  <div class="form-group">
    <label class="center-block">Name:
      <input class="form-control" formControlName="name">
    </label>
  </div>
  <div formGroupName="education">
    <h4>Education</h4>
    <div class="form-group">
      <label class="center-block">Degree:
        <select class="form-control" formControlName="degree">
            <option *ngFor="let degree of degrees" [value]="degree">{{degree}}</option>
        </select>
      </label>
    </div>
    <div class="form-group">
      <label class="center-block">Discipline:
        <input class="form-control" formControlName="discipline">
      </label>
    </div>
    <div class="form-group">
      <label class="center-block">Year:
        <input class="form-control" formControlName="year">
      </label>
    </div>
  </div>
  <div class="form-group">
    <label class="center-block">Age:
      <input class="form-control" formControlName="age">
    </label>
  </div>
  <div class="form-group radio">
    <h4>Gender:</h4>
    <label class="center-block"><input type="radio" formControlName="gender" value="male">Male</label>
    <label class="center-block"><input type="radio" formControlName="gender" value="female">Female</label>
  </div>
  <div class="checkbox">
    <label class="center-block">
      <input type="checkbox" formControlName="vacation">I have a vacation.
    </label>
  </div>
</form>
<p>Form value: {{ staffForm.value | json }}</p>
<p>Form status: {{ staffForm.status | json }}</p>
ผลลัพธ์ที่ได้ เราจะได้โครงสร้างข้อมูลของ staffForm.value เป็นดังนี้
Form value: {
  "name": "",
  "education": {
    "degree": "",
    "discipline": "",
    "year": ""
  },
  "age": "",
  "gender": "",
  "vacation": ""
}
การตรวจสอบค่าของ FormControl property
ตอนนี้เราสามรารถดูรูปแบบข้อมูลของ form control ทั้งหมดผ่านทาง staffForm.value แต่ถ้าเราต้องการจะดูเฉพาะบาง
รายการของ FormControl เราจะสามารถทำได้อย่างไรบ้าง
เราสามารถตรวจสอบค่าของ FormControl ที่ต้องการได้โดยใช้คำสั่ง .get() ซึ่งสามารถทำได้ภายใน component class
หรือจะแสดงใน template ก็ได้ โดยใช้รูปแบบดังนี้
ไฟล์ staff-detail.component.html (บางส่วน)
<p>Name value: {{ staffForm.get('name').value }}</p>
หรือกรณีดึงจากค่าใน FormGroup ย่อย อย่างหา degree ก็สามารถใช้รูปแบบบ
<p>Degree value: {{ staffForm.get('education.degree').value }}</p>
เราสามารถใช้เทคนิคนี้ในการแสดงข้อมูล property ใดๆของ FormControl ด้วยวิธีการต่อไปนี้
| Property | Description |
|---|---|
| myControl.value | หาค่าของ FormControl. |
| myControl.status | เช็คความถูกต้องของข้อมูล FormControl. โดยค่าที่อาจเป็นไปได้ คือ VALID, INVALID, PENDING, หรือ DISABLED |
| myControl.pristine | เช็คว่า FormControl นั้นยังไม่มีการเปลี่ยนแปลงใดๆ เกิดขึ้นหรือไม่ true คือยังไม่มีการเปลี่ยนแปลงค่า ตรงข้ามกับการกำหนดโดยใช้ myControl.dirty |
| myControl.untouched |
เช็คว่าผู้ใช้ได้เข้ามาทำอะไรกับ element นั้นๆ แล้วหรือไม่ เช่นเข้ามาคลิก แล้วก็ออกไป ตรงข้ามกับการกำหนดโดยใช้ myControl.touched |
ค่าการกำหนดข้างต้น เราสามารถนำไปใช้งานการกำหนดเรียกใช้งาน css class ให้การแสดงผลการตรวจ
สอบความถูกต้องของข้อมูลได้ เช่น หากข้อมูลว่าง ก็ให้แสดง css class ที่เป็นการแจ้งเตือนว่า FormControl
นั้นจำเป็นต้องกรอกข้อมูล แบบนี้เป็นต้น
ในตอนต่อไปเราจะมาดูเกี่ยวกับ data model และ form model ในการใช้งาน Reactive Form กันต่อ

 อ่านต่อที่บทความ
 เนื้อหาที่เกี่ยวข้อง