
เนื้อหาต่อไปนี้เป็นตอนสุดท้ายของบทความเกี่ยวกับ template syntax เบื้องต้น ซึ่งเรายัง
เหลือหัวข้อที่น่าสนใจหลักๆ อยู่อีก 3 หัวข้อ มาต่อกันที่หัวข้อแรกกันเลย
ตัวแปรอ้างอิง template - Template reference variables ( #var )
เราได้พูดไปบ้างแล้วเกี่ยวกับตัวแปรอ้างอิง template ตัวแปรอ้างอิง template หรือ template reference variable
จะอ้างอิงถึง DOM element ภายใน template รวมทั้งสามารถใช้อ้างอิงถึง Angular component , directive หรือ
web component
หมายเหตุ: web component นี้น่าจะเป็นอะไรใหม่ ถ้าสนใจลองเข้าไปดูผ่านลิ้งค์นี้
https://developer.mozilla.org/en-US/docs/Web/Web_Components แต่สำหรับของเราแค่รู้ว่ามีก็พอ
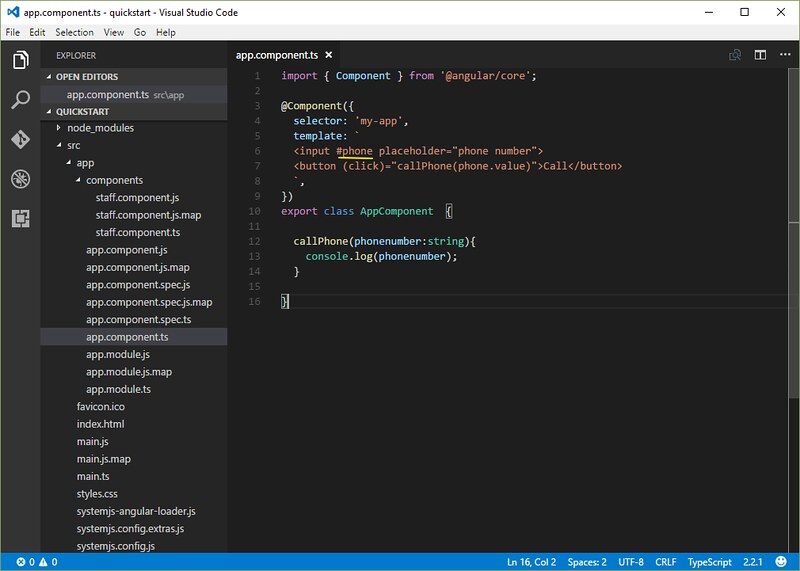
เรามาดูตัวอย่างการใช้งานตัวแปรอัางอิง template กัน
import { Component } from '@angular/core';

@Component({
  selector: 'my-app',
  template: `
  <input #phone placeholder="phone number">
  <button (click)="callPhone(phone.value)">Call</button>
  `,
})
export class AppComponent  {

  callPhone(phonenumber:string){
    console.log(phonenumber);
  }

}
จากตัวอย่าง เรากำหนดตัว "phone" เป็นตัวแปรอ้างอืง template ด้วยการใช้เครื่องหมาย (#) ไว้ด้านหน้า
ชื่อตัวแปรที่เราต้องการ อย่าง #phone ก็คือการกำหนดตัวแปร phone ลงบน <input> element
<input #phone placeholder="phone number">
โดยเราสามารถใช้งานตัวแปร phone นี้ซึ่งเป็นตัวแปรอ้างอิง template ในส่วนใดก็ได้ใน template นี้ อย่างในโค้ด
template บรรทัดต่อมา ตัวแปร phone ที่ถูกประกาศใน <input> element ถูกนำมาใช้งานใน <button> element
ซึ่งเป็นอีกส่วนของ template
<input #phone placeholder="phone number">
<button (click)="callPhone(phone.value)">Call</button>
จะเห็นว่าเราส่งค่า "value" property ของตัวแปร phone เข้าไปใน คำสั่ง callPhone()
นั้นแสดงว่าตัวแปร phone ที่ได้จากการอ้างอิงตัวแปร template ก็คือ DOM element
<input placeholder="phone number"> นั่นเอง
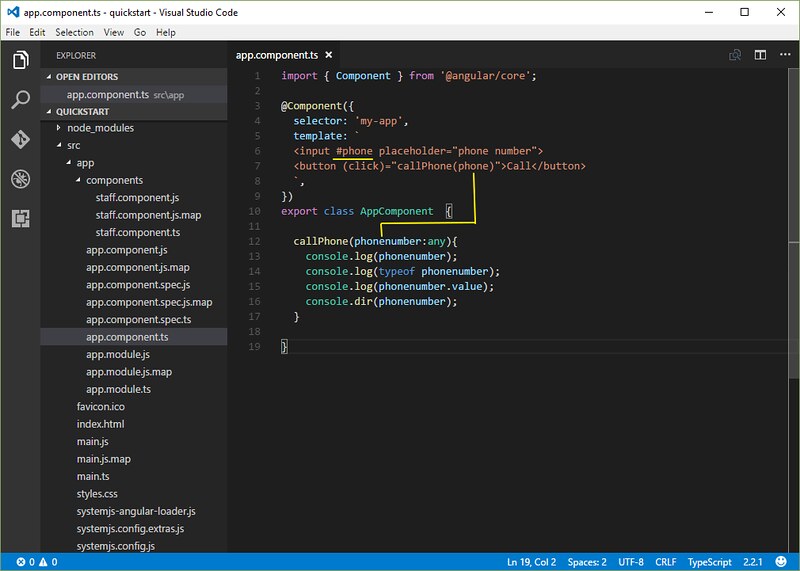
เราลองมาปรับโค้ดนิดหน่อย โดยแทนที่จะส่ง phone.value เข้าไป เราจะส่ง phone ที่เป็น
DOM element object เข้าไปแทน
import { Component } from '@angular/core';

@Component({
  selector: 'my-app',
  template: `
  <input #phone placeholder="phone number">
  <button (click)="callPhone(phone)">Call</button>
  `,
})
export class AppComponent  {

  callPhone(phonenumber:any){
    console.log(phonenumber);
    console.log(typeof phonenumber);
    console.log(phonenumber.value);
    console.dir(phonenumber);
  }

}
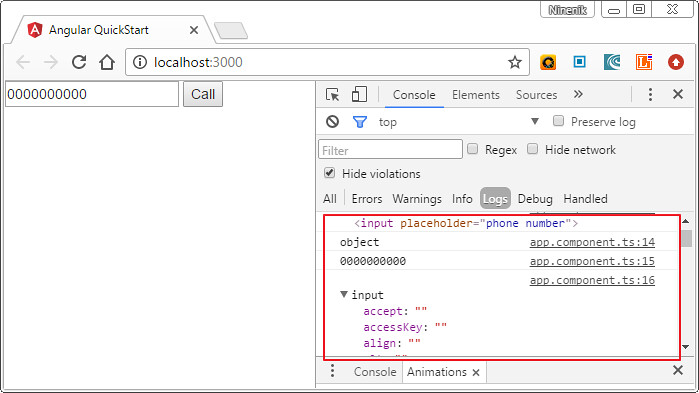
ผลลัพธ์ที่ได้ console.log(phonenumber); แรกเราจะได้ค่า
element ที่ตัวแปร phone อ้างอิง
<input placeholder="phone number">
console.log(typeof phonenumber); เราได้ทราบว่า phone เป็น Object
object
console.log(phonenumber.value); เราสมมติดึงค่า property "value" ของ Object มาแสดง
เราก็จะได้ค่าของข้อมูลที่เรากรอก
0000000000
และสุดท้ายเราใช้ console.dir(phonenumber); โดยการใช้ console.dir() จะทำให้เราทราบว่า
Object นี้มี property อะไรอีกบ้างที่เราสามารถใช้งาน นอกจาก "value" property
ดูภาพผลลัพธ์ประกอบ
สำหรับกรณีเราต้องการอ้างอิงตัวแปรจาก <form> โดยทั่วไปแล้วเราจะไม่ใช้วิธีกำหนดตัวแปรอ้างอิง template
ให้กับ input element แต่ละตัว แต่เราจะกำหนดให้กับ <form> element ตัวเดียว จากนั้นใช้การอ้างอิงจากชื่อ
ของ element ในการเรียกใช้งาน สามารถทบทวนการใช้งาน form ได้ทีหัวข้อบทความ
"ทบทวนบทความได้ที่"
การส่งค่าข้อมูลจาก Form ใน Angular app เบื้องต้น
https://www.ninenik.com/content.php?arti_id=778 via @ninenik
ข้อสังเกตเกี่ยวกับตัวแปรอ้างอิง template - Template reference variable
ตามที่เราเคยย้ำมาแล้วในบทความตอนที่ผ่านมาว่าตัวแปร template reference variable (#phone) ไม่ใช้ตัวแปรเดียวกัน
กับตัวแปร template input variable (let phone) อย่างกรณีที่เราเคยใช้กำหนดในการใช้งาน *ngFor
เราสามารถกำหนดชื่อตัวแปร template reference variable กับ template input variable เหมือนกันได้ เพราะ
เป็นคนละตัว
ซึ่งการกำหนดตัวแปร template reference variable นั้นเราไม่ควรกำหนดให้มีเชื่อซ้ำกัน เพราะ scope หรือขอบเขต
การเรียกใช้งานตัวแปรนี้ จะครอบคลุมทุกส่วนใน template ดังนั้นถ้าชื่อตัวแปรซ้ำกัน อาจจะเกิดข้อผิดพลาด ไม่สามารถ
อ้างอิงค่าที่ถูกต้องได้
นอกจากการกำหนดตัวแปรโดยใช้ (#) แล้ว เรายังสามารถกำหนดตัวแปร template reference variable โดยการ
ใช้คำว่า "ref-" ไว้ด้านหน้าเพื่อกำหนดตัวแปรได้ ยังตัวอย่างเช่น ref-fax แทน #fax แบบนี้เป็นต้น
<input ref-fax placeholder="fax number">
<button (click)="callFax(fax)">Call</button>
การใช้งาน Input and output properties ( @Input and @Output )
เราได้ทำความรู้จักการใช้งานการเชื่อมข้อมูลจาก component มาใช้งานในนิพจน์ของ template (template
expression) และคำสั่งควบคุม template (template statement) ซึ่งจะอยู่ด้านขวามือของการประกาศการเชื่อม
โยงข้อมูล เราเรียกส่วนนี้แหล่งข้อมูลเชื่อมโยง
ในหัวข้อนี้เราจะมาพูดถึงการเชื่อมโยงเป้าหมาย ที่เป็น directive property ที่อยู่ด้านซ้ายมือของการประกาศการเชื่อม
โยงข้อมูล โดย directive property เหล่านี้กำหนดเป็น inputs หรือ outputs
ทบทวนความเข้าใจก่อนเข้าสู่รายละเอียด
- จำไว้เสมอว่า component ทุกตัวก็คือ directive
- ในการกำหนดการเชื่อมโยงข้อมูลตามที่เราได้ทำความรู้จักมาแล้วนั้น เป็นการเชื่ยมโยงข้อมูล
ระหว่างข้อมูลที่เป็นเป้าหมาย กับ แหล่งข้อมูล หรือ target กับ source
- target จะอยู่ด้านซ้ายมือของเครื่องหมาย = ส่วน source จะอยู่ฝั่งขวามือ
- target ก็คือ property หรือ event ที่อยู่ในเครื่องหมาย [], () หรือ [()] ส่วน source ก็คือค่าที่อยู่ใน
สัญลักษณ์ ("...") หรือ อยู่ในรูปแบบการแทรกค่าตัวแปร ({{}})
- ทุกๆ ค่าที่เป็น source directive เช่น component property , คำสั่งหรือฟังก์ชั่นใน component สามารถ
ทำการเชื่อมโยงข้อมูลกับ template ได้ โดยไม่ต้องกำหนดอะไรพิเศษเพิ่มเติมเข้าไปในนิพจน์ของ template
หรือเข้าไปในคำสั่งควบคุม template
- เราไม่สามารถเข้าถึงและใช้งาน target directive ได้ เราสามารถทำได้เพียงเชื่อมโยง property นั้นโดยการ
ระบุให้ชัดว่าส่วนนั้นเป็น inputs หรือ outputs
"ทบทวนเพิ่มเติมได้ที่บทความ"
การเชื่อมโยงข้อมูล Data Binding รูปแบบต่างๆ ใน Angular
https://www.ninenik.com/content.php?arti_id=787 via @ninenik
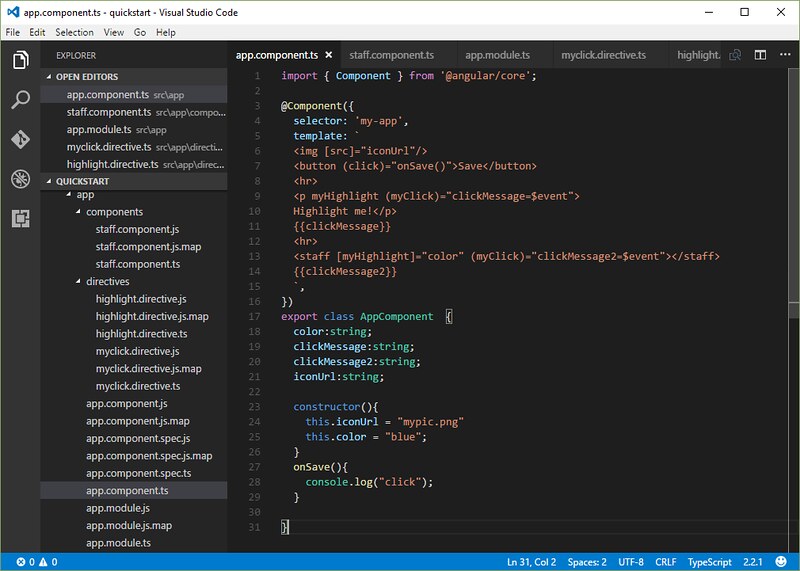
ต่อไปเราลองมาดูโค้ดตัวอย่างกัน เพื่อทำความรู้จักกับ Input Output property เบื้องต้นกัน
import { Component } from '@angular/core';

@Component({
  selector: 'my-app',
  template: `
  <img [src]="iconUrl"/>
  <button (click)="onSave()">Save</button>
  <hr>
  <p myHighlight (myClick)="clickMessage=$event">
  Highlight me!</p>
  {{clickMessage}}
  <hr>
  <staff [myHighlight]="color" (myClick)="clickMessage2=$event"></staff>
  {{clickMessage2}}
  `,
})
export class AppComponent  {
  color:string;
  clickMessage:string;
  clickMessage2:string;
  iconUrl:string;

  constructor(){
    this.iconUrl = "mypic.png"
    this.color = "blue";
  }
  onSave(){
    console.log("click");
  }

}
เรายกเฉพาะส่วนนี้มาดูกัน
<img [src]="iconUrl"/>
<button (click)="onSave()">Save</button>
"iconUrl" กับ "onSave" เป็น ค่าขอบเขตข้อมูล หรือ data-bound ใน AppComponent หรือที่เรารู้จักกัน
ในชื่อว่า component property ซึ่งก็คือตัวแปรใน component โดยค่าเหล่านี้จะถูกอ้างอิงถึงเมื่อมีการเชื่อมโยง
ข้อมูลโดยจะอยู่ทางด้านขวาของเครื่องหมาย (=)
ทั้งสองค่านี้ไม่ใช่ค่า input หรือ output ของ component ค่าเหล่านี้เป็น source หรือแหล่งข้อูลสำหรับการ
เชื่อมโยงตามที่เราได้อธิบายไปแล้วด้านบน เกี่ยวกับ source และ target ส่วน target ของการเชือมโยง
ข้อมูลก็คือ "src" และ "click" ซึ่งเป็น property และ event ของ element เป้าหมาย
ต่อไปมาดูโค้ดส่วนนี้ต่อ
<p myHighlight (myClick)="clickMessage=$event">Highlight me!</p>
เราจะเห็นว่า myHilight กับ myClick นั้น เป็น attribute directive ที่เราสร้างขึ้นมาใช้งานเอง
การเชื่อมโยงข้อมูลของ myHighlight เป็นแบบ property binding ส่วนการเชื่อมโยงข้อมูลของ
myClick เป็นแบบ event binding
ดูต่อที่ตัวอย่างโค้ดต่อไป จะได้เห็นภาพชัดเจนขึ้น
<staff [myHighlight]="color" (myClick)="clickMessage2=$event"></staff>
"staff" เป็น component directive
"myHighlight" เป็น attribute directive เชื่อมโยงข้อมูลด้วย property ให้มีค่าเท่ากับ color
จะเห็นว่า "myHighlight" จะรับค่าจากนิพจน์ทางขวามือ หรือก็คือตัวแปร color ที่เป็นค่าจากนิพจน์นี้จะถูกนำ
ไปใช้งานใน "myHighlight" property ใน directive อีกที เราจึงเรียก "myHighlight" นี้ว่า
ส่วนของ input property
"myClick" เป็น attribute directive เชื่อมโยงข้อมูลด้วย event ให้ทำคำสั่งกำหนดค่าให้ตัวแปร
clickMessage2 ให้มีค่าเท่ากับ $event object จะเห็นว่า "myClick" event จะส่งค่า $event object ออกมาจาก
directive อีกที เราจึงเรียก "myClick" นี้่ว่า ส่วนของ output property
ให้จำแบบนี้ว่า ส่งค่าเข้าไปใน property เรียกว่า input ส่งค่าออกเรียกว่า output
การที่เราจะเรียกใช้งาน attribute directive ที่กำหนดเองมาใช้งาน ก็จะคล้ายๆ กับการใช้งาน component
เราต้องไป import และประการใช้งาน directive class นั้นๆ ก่อน อย่างในที้ประกาศไว้ใน @NgModule
ในไฟล์ app.module.ts
ไฟล์ app.module.ts
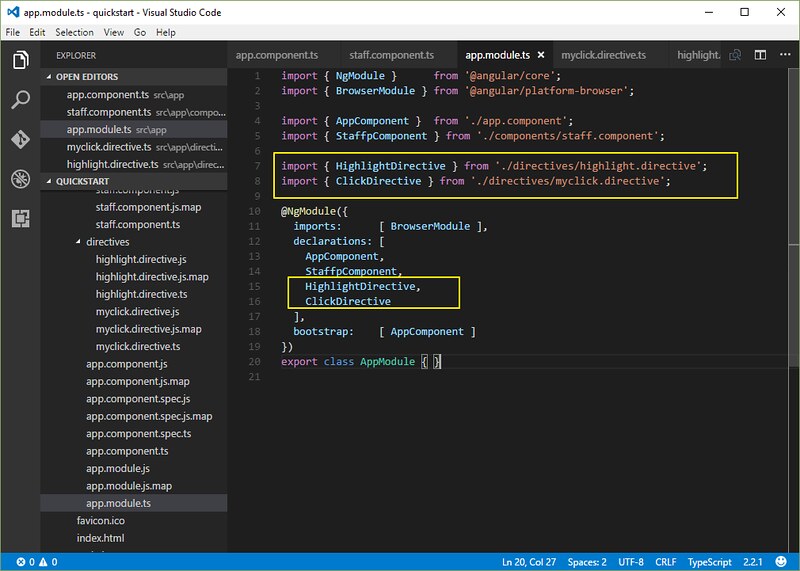
import { NgModule }      from '@angular/core';
import { BrowserModule } from '@angular/platform-browser';

import { AppComponent }  from './app.component';
import { StaffpComponent } from './components/staff.component';

import { HighlightDirective } from './directives/highlight.directive';
import { ClickDirective } from './directives/myclick.directive';

@NgModule({
  imports:      [ BrowserModule ],
  declarations: [
    AppComponent,
    StaffpComponent,
    HighlightDirective,
    ClickDirective
  ],
  bootstrap:    [ AppComponent ]
})
export class AppModule { }
เราลองเข้าไปดูไฟล์ attribute directive ที่เราสร้างขึ้นมาทั้งสองอันข้างต้นกันดู พร้อมทำความรู้จักกับ
การใช้งาน @Input และ @Output decorator เบื้องต้นกัน
ไฟล์ highlight.directive.ts
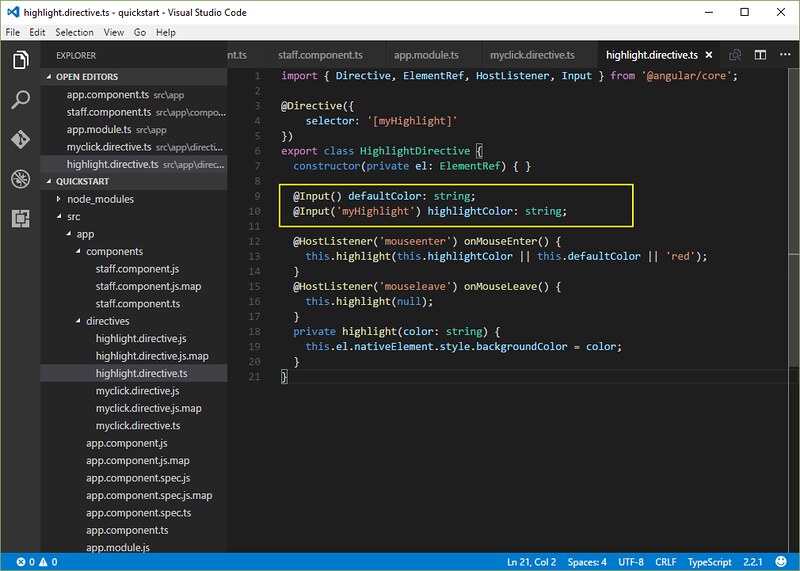
import { Directive, ElementRef, HostListener, Input } from '@angular/core';

@Directive({
    selector: '[myHighlight]'
})
export class HighlightDirective {
  constructor(private el: ElementRef) { }

  @Input() defaultColor: string;
  @Input('myHighlight') highlightColor: string;

  @HostListener('mouseenter') onMouseEnter() {
    this.highlight(this.highlightColor || this.defaultColor || 'red');
  }
  @HostListener('mouseleave') onMouseLeave() {
    this.highlight(null);
  }
  private highlight(color: string) {
    this.el.nativeElement.style.backgroundColor = color;
  }
}
เราจะไม่ลงลึกในรายละเอียดการทำงานทั้งหมด เพราะเนื้อหาเกี่ยวกับการสร้าง directive ขึ้นมาใช้งาน เราจะ
ได้อธิบายเพิ่มเติมในตอนต่อๆ ไป ในที่นี้เราเข้ามาดูการใช้งาน @Input decorator กัน
จากโค้ดเราจะเห็นว่าไฟล์นี้เป็นการสร้าง directive class รูปแบบจะคล้ายๆ กับการสร้าง component
ตัว selector ที่กำหนด ก็คือชื่อ property ที่เรานำไปใช้งาน การที่เราจะส่งค่าจากการเชื่อมโยงข้อมูลด้วย
property เข้ามาใช้งานใน directive class นี้เราต้องกำหนดค่า input ตามรูปแบบดังนี้
สังเกตบรรทัด
@Input() defaultColor: string;
@Input('myHighlight') highlightColor: string;
การกำหนด input property โดยใช้ @Input decorator ก็เพื่อบอก Angular ให้รู้ว่า ตัวแปรนี้เป็น public สามารถ
เรียกใช้งานจาก component หลักได้ จากตัวอย่างโค้ดบางส่วน
<staff [myHighlight]="color" (myClick)="clickMessage2=$event"></staff>
เราสามารถใช้งาน "defaultColor" property ได้ โดยสามารถเพิ่มเข้าไปดังนี้
<staff [myHighlight]="color" defaultColor="violet" (myClick)="clickMessage2=$event"></staff>
defaultColor เป็น input รับค่าแบบ string กรณีเราต้องใช้นิพจน์ที่ให้ค่าเป็น string เราก็สามารถทำการ
เชื่อมโยงด้วย property เป็น
<staff [myHighlight]="color" [defaultColor]="color" (myClick)="clickMessage2=$event"></staff>
เมื่อ color คือตัวแปรเก็บชื่อ color ที่เป็น string
ส่วน "myHighlight" เรามาดูความแตกต่างของการกำหนด @Input จะเห็นว่า มีการใช้ชื่อเรียกแทน ในการ
อ้างอิงตัวแปร สมมติเรากำหนด เป็นรูปแบบคล้ายๆ defaultColor
@Input() myHighlight: string;
เราก็สามารถใช้งานได้ คล้ายกับตัวอย่าง
<p myHighlight (myClick)="clickMessage=$event">Highlight me!</p>
แต่โดยทั่วไป เราต้องการให้การใช้งาน property นี้มีความยึดหยุ่นรองรับการปรับแต่งค่าได้ เช่น
สมมติเราต้องการรับค่าชื่อสี เข้ามาใช้งานใน directive เราอาจจะกำหนด เป็น
@Input() defaultColor: string;
@Input() highlightColor: string;
@Input() myHighlight: string;
ถ้าเราใช้แค่สอง input property แค่สองตัว คือ myHighlight กับ highlightColor เวลานำไปใช้เชื่อมต่อ
<p myHighlight [highlightColor]="color">test</p>
รูปแบบข้างต้นเราต้องการใช้ใช้งาน การ highlight ข้อความของ <p> element พร้อมกับรับค่า สีสำหรับทำ
highlight ผ่าน highlightColor property ไปพร้อมๆ กันด้วย และถึงแม้จะเป็นวิธีที่สามารถทำได้ แต่จะดีกว่าไหม
ถ้าเราใช้ property เพียงตัวเดียวเพื่อกำหนดแทนสองค่าได้ หรือให้อยู่ในรูปแบบนี้แทน
<p [myHighlight]="color">test</p>
และนี้คือเหตุผลที่ @Input decorator รองรับการใช้ชื่อเรียกแทนได้ ในการกำหนดค่า โดยจากเดิมเรากำหนด 3 ค่า
ก็เปลี่ยนเป็น สองค่า โดยรวมค่าที่ใช้ร่วมกันมาเป็นค่าเดียว ดังนี้
@Input() defaultColor: string;
@Input('myHighlight') highlightColor: string;
ลักษณะด้านบน คือใช้ myHighlight แทนทั้ง myHighlight และ highlightColor พร้อมกัน
ต่อไปเรามาดูในส่วนของไฟล์ myclick.directive.ts สำหรับการใช้งาน @Output decorator กันต่อ
ไฟล์ myclick.directive.ts
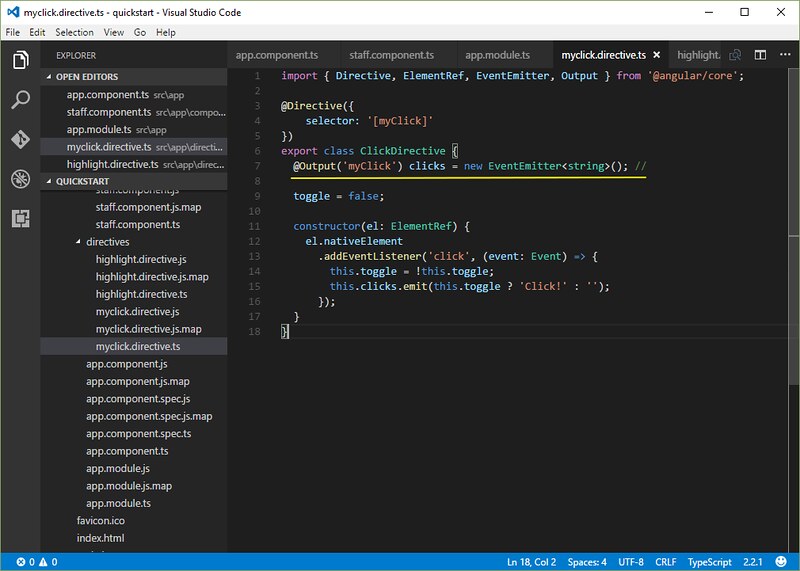
import { Directive, ElementRef, EventEmitter, Output } from '@angular/core';

@Directive({
    selector: '[myClick]'
})
export class ClickDirective {
  @Output('myClick') clicks = new EventEmitter<string>(); //

  toggle = false;

  constructor(el: ElementRef) {
    el.nativeElement
      .addEventListener('click', (event: Event) => {
        this.toggle = !this.toggle;
        this.clicks.emit(this.toggle ? 'Click!' : '');
      });
  }
}
จากโค้ดเราจะเห็นว่ามีการสร้าง directive class ชื่อ ClickDirective กำหนดให้ selector เท่ากับ [myClick]
โดยตัว selector ที่กำหนดก็จะถูกนำไปใช้เป็น property ในการเชื่อมโยงข้อมูลด้วย event
การที่เราจะส่งค่า จาก directive class ไปใช้งานได้นั้น เราต้องกำหนดค่า output ตามรูปแบบนี้
@Output('myClick') clicks = new EventEmitter<string>();
สังเกตว่ามีการใช้ชื่อเรียกแทน คล้ายกับรูปแบบการกำหนดใน @Input decorator
ในที่นี้จะไม่ขอลงลึกถึงรายละเอียดการทำงาน ให้เราเข้าใจแค่รูปแบบการกำหนด @Output decorator
เท่านั้นพอ
เราสามารถกำหนด input property และ output property นอกจากรูปแบบที่กำหนดใน class ด้วย
@Input decorator และ @Output decorator แล้วยังสามารถกำหนดใน metadata ใน @Directive
ดังนี้แทนได้
กำหนดใน @Directive metadata กรณี input property
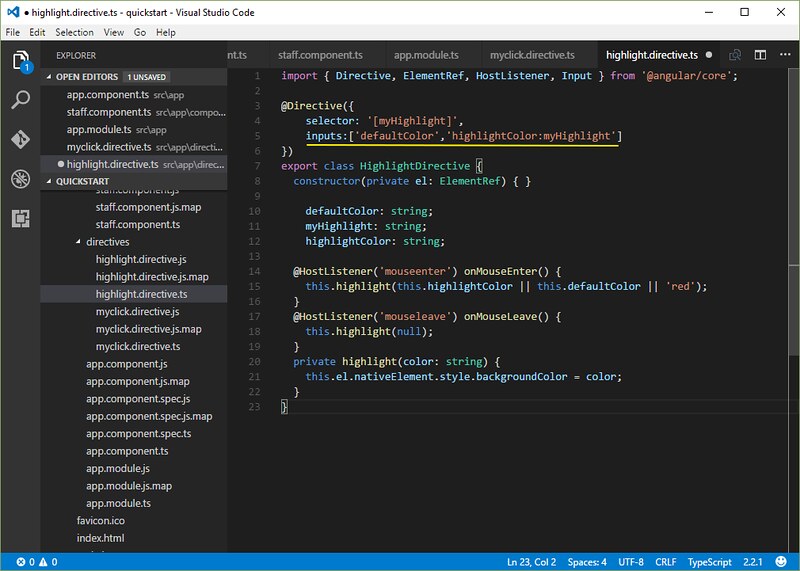
@Directive({
    selector: '[myHighlight]',
    inputs:['defaultColor','highlightColor:myHighlight']
})
กำหนดใน @Directive metadata กรณี output property
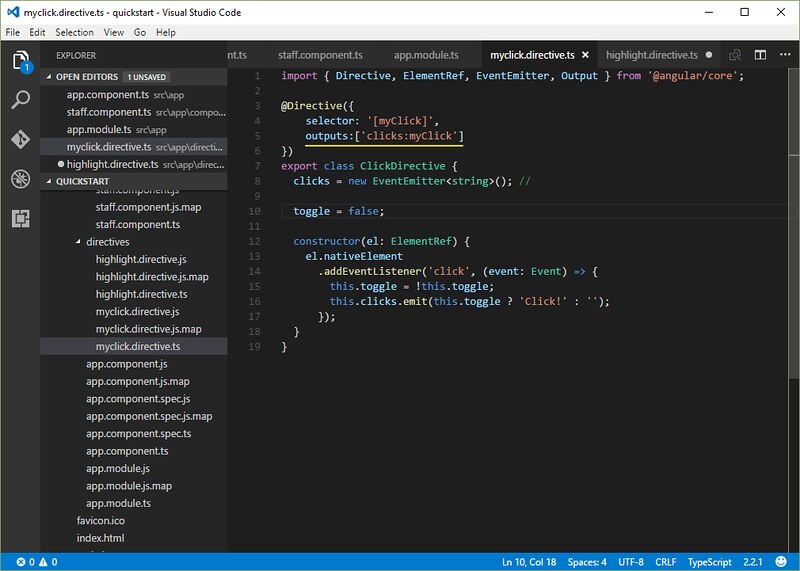
@Directive({
    selector: '[myClick]',
    outputs:['clicks:myClick']
})
ตัวดำเนินการของนิพจน์ template - Template expression operators
การกำหนดนิพจน์ของ template หรือ template expression เป็นส่วนหนึ่งที่ใช้งานในรูปแบบของ JavaScript
โดยมีการเสริมด้วยตัวดำเนินการพิเศษ pipe operator ( | ) และ safe navigation operator ( ?. )
การใช้งาน pipe operator ( | )
ในบางกรณีเราต้องการให้ผลลัพธ์ของนิพจน์ หรือ expression นั้นมีการแปลงค่าหรือรูปแบบข้อมูลก่อนนำไปใช้งาน
หรือก่อนนำมาแสดง ยกตัวอย่างเช่น ต้องการแสดงตำเลขในรูปแบบจำนวนเงินตรา หรือการปรับให้ข้อความแสดง
เป็นตัวพิมพ์ใหญ่ หรือการกรองลิสต์รายการและจัดเรียงรายการใหม่ เหล่านี้เป็นต้น
Angular ใช้ pipe operator ( | ) ในการจัดการกับรูปแบบการแสดงข้อมูลข้างต้น Pipe เป็นรูปแบบฟังก์ชั่นง่ายๆ ที่รับ
ค่าเข้ามาแล้วคืนค่าที่มีการแปลงค่าแล้วกลับออกมา โดยทั่วไปจะใช้ใน นิพจน์ของ template เพราะสามารถนำไป
ใช้งานได้อย่างง่ายดาย ยกตัวอย่าง
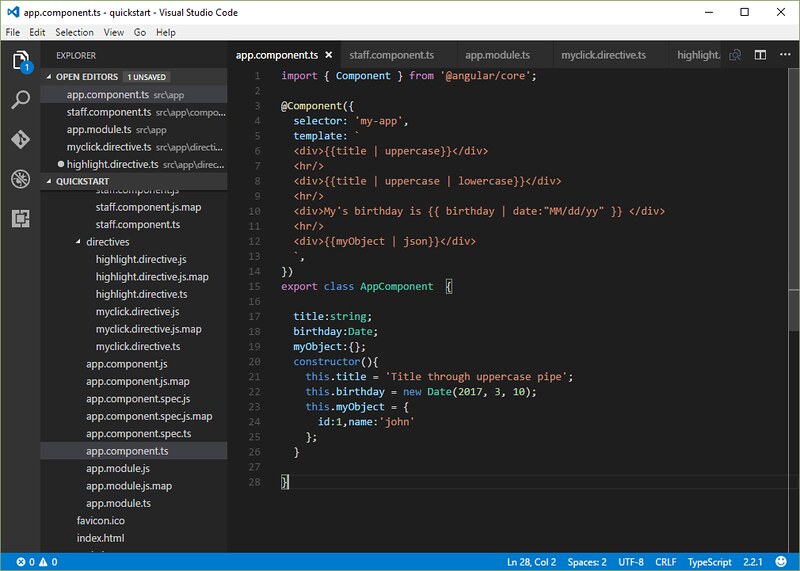
import { Component } from '@angular/core';

@Component({
  selector: 'my-app',
  template: `
  <div>{{title | uppercase}}</div>
  <hr/>
  <div>{{title | uppercase | lowercase}}</div>
  <hr/>
  <div>My's birthday is {{ birthday | date:"MM/dd/yy" }} </div>
  <hr/>
  <div>{{myObject | json}}</div>
  `,
})
export class AppComponent  {

  title:string;
  birthday:Date;
  myObject:{};
  constructor(){
    this.title = 'Title through uppercase pipe';
    this.birthday = new Date(2017, 3, 10);
    this.myObject = {
      id:1,name:'john'
    };
  }

}
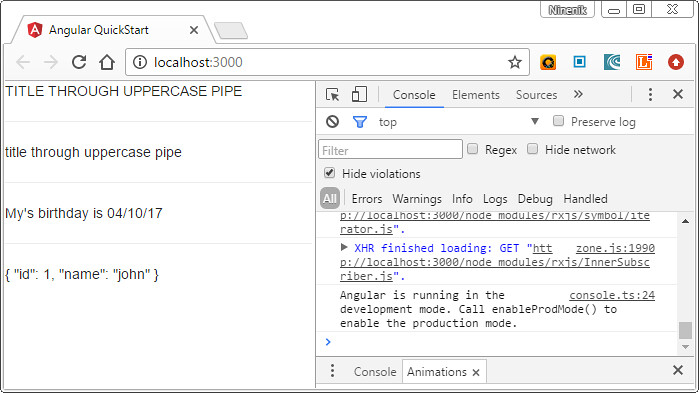
การแสดงหัวข้อเป็นตัวพิมพ์ใหญ่ ทั้งหมด ตามโค้ดด้านล่าง
<div>{{title | uppercase}}</div>
ข้อความ "Title through uppercase pipe" จะแสดงเป็นตัวพิมพ์ใหญ่ทั้งหมด โดยจะกลายเป็น
"TITLE THROUGH UPPERCASE PIPE"
หรือเราสามารถใช้งาน pipe ฟังก์ชั่นอย่างต่อเนื่องได้โดยสามารถกำหนดได้ดังนี้
<div>{{title | uppercase | lowercase}}</div>
หรือสามารถกำหนด parameter ให้กับ pipe ตามรูปแบบ
<div>My's birthday is {{ birthday | date:"MM/dd/yy" }} </div>
หรือใช้ json pipe ในการ debug ตัวค่า property ต่างๆ ใน object
<div>{{myObject | json}}</div>
ตัวอย่างผลลัพธ์ที่ได้จากการใช้งาน Pipe operator
รายละเอียดเกี่ยวกับ pipe เพิ่มเติมเราคงะได้พบเจอและทำความเข้าใจเพิ่มเติมอีกต่อไป
การใช้งาน safe navigation operator ( ?. ) และ null ใน path ของ property
ตัวดำเนินการ safe navigation ( ?. ) เป็นวิธีที่คล่องและสะดวกในการใช้ป้องกันค่าที่เป็น null หรือ undefined
ใน path ของ property
ดูตัวอย่างโค้ดต่อไปนี้
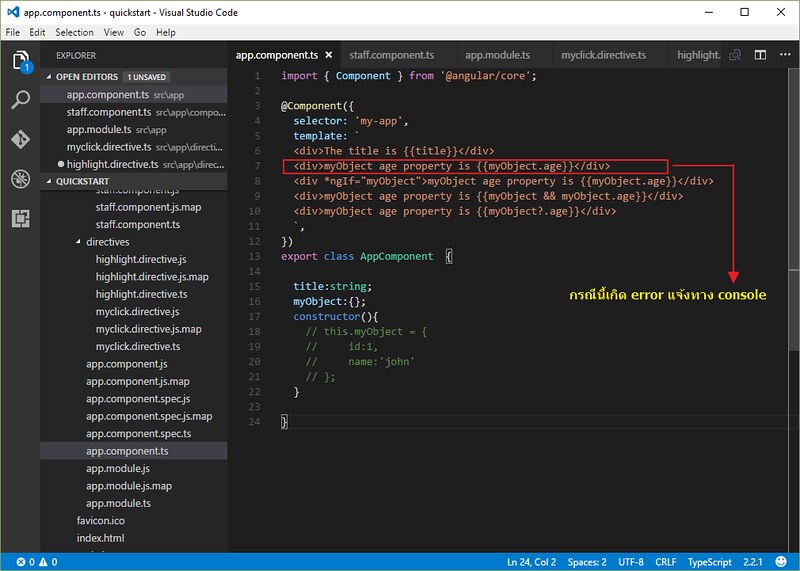
import { Component } from '@angular/core';

@Component({
  selector: 'my-app',
  template: `
  <div>The title is {{title}}</div>
  <div>myObject age property is {{myObject.age}}</div>
  <div *ngIf="myObject">myObject age property is {{myObject.age}}</div>
  <div>myObject age property is {{myObject && myObject.age}}</div>
  <div>myObject age property is {{myObject?.age}}</div>
  `,
})
export class AppComponent  {

  title:string;
  myObject:{};
  constructor(){
    // this.myObject = {
    //     id:1,
    //     name:'john'
    // };
  }

}
เมื่่อเราเรียกใช้งานตัวแปร title ซึ่งไม่ได้กำหนดค่าให้มัน จึงมีค่าเป็น null หรือ undefined
<div>The title is {{title}}</div>
เวลาแสดงผล ก็จะแสดงเฉพาะข้อความ The title is และไม่มีการแจ้ง error ใดๆ ส่วนนี้
ลักษณะดังกล่าวยังถึอว่าสมเหตุสมผล เพราะอย่างน้อยไม่มีการแจ้ง error หรือโปรแกรมทำงานผิด
พลาดแต่อย่างใด
ต่อไปบรรทัด
<div>myObject age property is {{myObject.age}}</div>
จะเห็นว่า myObject เราไม่ได้กำหนดค่าให้ จึงเป็น null หรือ undefined
เมื่อเรามีการเรียกใช้ path ของ property ตามรูปแบบข้างต้น
JavaScript แสดง error ทาง console ว่าเกิดการผิดพลาดในการอ้างอิงตัวแปร undefined
TypeError: Cannot read property 'age' of undefined
กรณี error ในลักษณะข้างต้นจะไม่เกิดขึ้นเลย ถ้าเรากำหนดให้ myObject ต้องไม่เป็นค่า null หรือ undefined
อย่างไรก็ตาม ในบางครั้งค่า null ก็จำเป็นตามเงื่อนไขของเวลา ยกตัวอย่างเช่น เริ่มต้นไม่มีข้อมูลใดๆ ค่า
ก็ควรจะเป็น null หลังจากนั้นค่าค่อยเปลี่ยนแปลงตามข้อมูลที่เพิ่มหรือดึงเข้ามา
ดังนั้นวิธีการที่เป็นไปได้ในการแก้ปัญหา เพื่อที่ให้ให้กรณีค่าตัวแปรใน path ของ property เป็น null หรือ undefined
เราสามารถกำหนดในลักษณะนี้ได้ โดยใช้ *ngIf
<div *ngIf="myObject">myObject age property is {{myObject.age}}</div>
ถ้าตัวแปร myObject ไม่เท่ากับ null ให้แสดงค่า property path ได้
หรือใช้แบบนี้แทน
<div>myObject age property is {{myObject && myObject.age}}</div>
ให้แสดงค่า property path ได้ ก็ต่อเมื่อ myObject ไม่เท่ากับ null หรือ undefined
วิธีแก้ปัญหาทั้งสองรูปแบบทำให้เวลารัน จะไม่เกิด error ขึ้น
แต่ปัญหาก็คือ จะทำอย่างไร ถ้า path ของ property มีรูปแบบที่ยาวกว่าเดิม เช่นในรูปแบบ a.b.c.d.
ตัวดำเนินการ safe navigation ( ?. ) จึงเป็นวิธีที่คล่องและสะดวกในการใช้ป้องกันค่าที่เป็น null หรือ
undefined ในการกรณีดังกล่าวนี้ โดยสามารถกำหนดในรุปแบบ
<div>myObject age property is {{myObject?.age}}</div>
ผลที่ได้กรณีตัวแปร myObject เป็น null หรือ undefined ก็คือ ข้อความแสดงแค่
myObject age property is และไม่แสดง error หรือไม่ทำให้โปรแกรมหยุดทำงาน
การใช้ตัวดำเนินการ safe navigation ( ?. ) ยังสามารถใช้งานในรูปแบบที่มีการเรียก path ของ property
ที่ยาวกว่าปกติ เช่น {{myObject?.age?.year}} แบบนี้เป็นต้นได้
สำหรับเนื้อหาเกี่ยวกับ template syntax เบื้องต้น ก็จบลงเพียงเท่านี้ ต่อไปเราจะศึกษาเกี่ยวกับหัวข้ออะไร
รอติดตาม ที่สำคัญจะเห็นว่า เนื้อหาจะค่อยๆ เข้มข้นและยากขึ้นเรื่อยๆ ขอให้ทบทวนบ่อยๆ และ
ทดสอบรันโค้ดตัวอย่างประกอบ จะช่วยให้ทำความเข้าใจได้ง่ายขึ้น

 อ่านต่อที่บทความ
 เนื้อหาที่เกี่ยวข้อง