
เนื้อหาตอนนี้ เรามารู้จักวิธีการนำข้อมูลมาแสดงใน template โดยข้อมูล
ที่จะใช้เป็นค่าของ component proerty หรือก็คือค่าตัวแปรที่เรากำหนดใน
component class นั่นเอง ดูรูปด้านล่างประกอบ
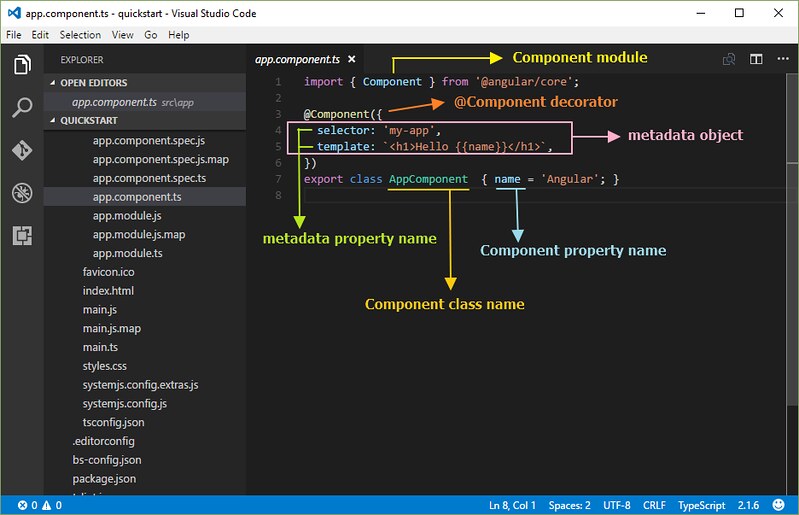
จากรูป ตัวแปร name คือ component property ที่ถูกนำค่าไปแสดงใน template ด้วย
การกำหนด {{ชื่อ component property}} ซึ่งจะได้เป็น {{name}}
โดยการใช้ ดับเบิ้ลปีกกา นั้นเรียกว่า interpolation ทั้งนี้ผู้เขียนขอใช้เป็น การแสดงข้อมูล
โดยการแทรก component property
ขอยกโค้ดตัวอย่างไฟล์ app.component.ts มาประกอบการอธิบายเพิ่มเติม ดังนี้
import { Component } from '@angular/core';

@Component({
  selector: 'my-app',
  template: `
  <h3>{{title}}</h3>
  <hr/>
  <strong>Name:</strong> {{name}} <br/>
  <strong>Age:</strong> {{age}} <br/>
  <strong>Address:</strong>
  {{address.addr1}} {{address.district}} {{address.amphur}}
  {{address.province}} {{address.zipcode}} <br/>
  <strong>Sports</strong> <br/>
  <ul>
    <li *ngFor='let sport of sports'>
      {{sport}}
    </li>
  </ul>
  <strong>Status:</strong>
  <span *ngIf='status'>Active</span>
  <span *ngIf='!status'>Not Active</span> <br/>
  `,
})
export class AppComponent  {
  title = 'User Profile';
  name = 'Angurlar 2';
  age = 24;
  address = {
    addr1:'224',
    district:'คลองจั่น',
    amphur:'บางกะปิ',
    province:'กรุงเทพฯ',
    zipcode:'10240'
  }
  sports = ['Football','Tennis','Bowling'];
  status = false;
}
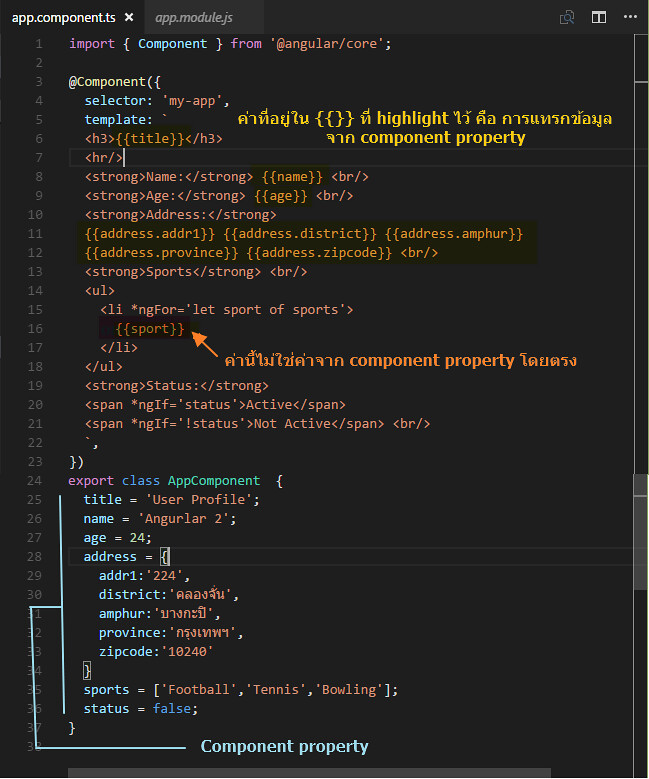
จากตัวอย่างข้างต้น ให้ดูเฉพาะส่วนของการใช้งาน component property นำไปแสดงผลโดยการใช้
{{}} น่าจะเข้าใจได้ไม่ยาก สังเกตว่า เรามีการกำหนด component property ในลักษณะตัวแปรหลายๆ
รูปแบบ เช่น เป็น string (title, name) number (age) object (address) array (sports) และ
boolean (status)
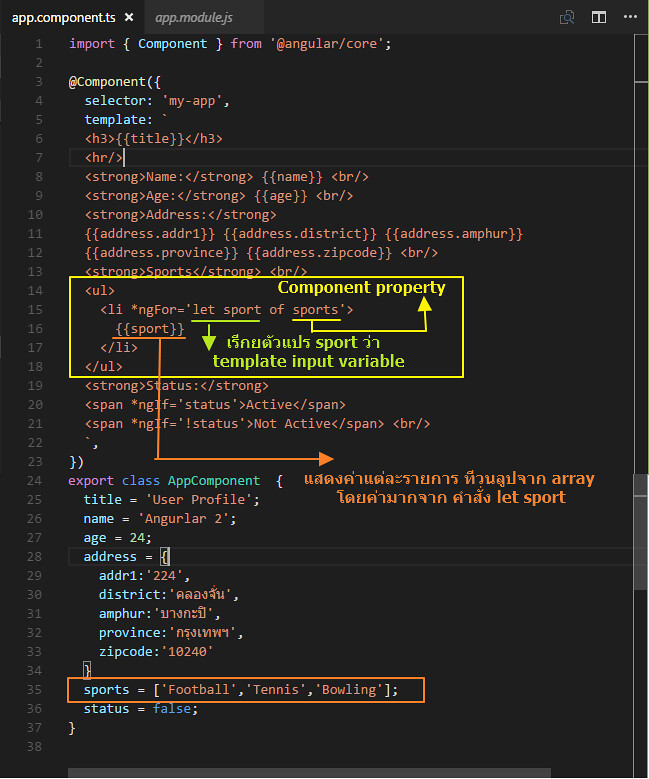
การแสดงข้อมูลที่เป็น array ใน template ด้วย *ngFor directive
ต่อไปเรามาดูในส่วนของการแสดง array สังเกตจากรูป ดูในส่วนของโค้ดเกี่ยวกับ
การวนลูปทำซ้ำ ของแท็ก <li> ใน template โดยใช้ *ngFor directive จัดการ
  <ul>
    <li *ngFor='let sport of sports'>
      {{sport}}
    </li>
  </ul>
*ngFor คือ Angular "repeater" directive ทำหน้าที่ในการทำการวนลูปทำซ้ำ ซึ่งในตัวอย่าง
ก็คือทำการวนลูปแสดงค่าข้อมูลใน array ใน <li>
การใช้คำว่า let แล้วต่อด้วยตัวแปร sport เป็นการสร้างตัวแปรที่เรียกว่า template input variable
โดยไปวนลูปดึงค่าในตัว array ที่ชื่อ sports ที่เป็น component property จากนั้น
นำค่า sport ของแต่ละ array มาแสดงใน <li> โดยใช้ {{sport}}
ถ้าเราอยากรูป index ของ array สามารถกำหนดเพิ่มเติมได้ดังนี้
  <ul>
    <li *ngFor='let sport of sports; let i=index'>
      {{i+1}}. {{sport}}
    </li>
  </ul>
โดยค่า i จะเริ่มต้นที่ 0 แต่เวลาแสดง เราสามารถ บวกค่าเพิ่มเพื่อแสดงลำดับให้ถูกต้องได้
การกำหนดเงื่อนไขแสดงหรือไม่แสดงข้อมูลด้วย *ngIf
ในการกรณีที่เราต้องการแสดง หรือไม่แสดงรายการข้อมูลบางส่วน เราสามารถใช้งาน
*ngIf directive โดยจะอยู่ภายใต้เงื่อนไข true/false สังเกตตัวอย่างตามโค้ด้านล่าง ดังรูป
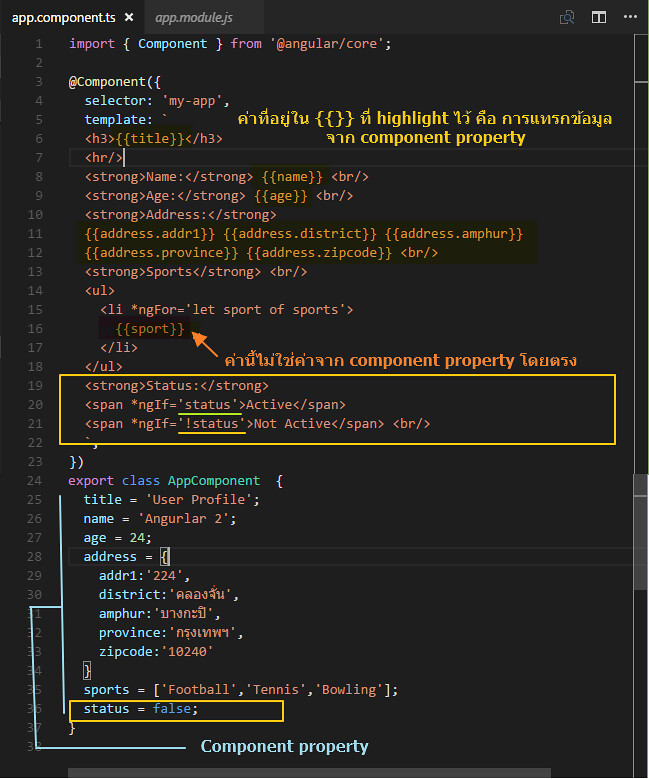
  <strong>Status:</strong>
  <span *ngIf='status'>Active</span>
  <span *ngIf='!status'>Not Active</span> <br/>
สังเกตว่าหัวข้อ Status เรากำหนดให้มีการใช้งาน <span> 2 ตัว คือที่เป็นข้อความว่า
Active กับ Not Active โดยใช้ *ngIf ในการกำหนดเงื่อนไขว่าจะแสดงหรือไม่แสดง ในที่นี้
ใช้ component property ที่เป็น boolean มีค่าเป็น true หรือ false
การใช้เครื่อง ! ด้านหน้า จะหมายถึงมีค่าตรงกันข้ามกับที่ของตัวเป็นเอง ดังนั้นถ้า
status เท่ากับ true แล้ว !status จะเท่ากับ false แบบนี้เป็นต้น
จะได้ว่า
*ngIf='status' ถ้า status เท่ากับ true คำว่า active จะแสดง และในขณะเดียวกับ
*ngIf='!status' ก็จะทำให้ Not Active ไม่แสดง เพราะ !status = fasle นั้นเอง
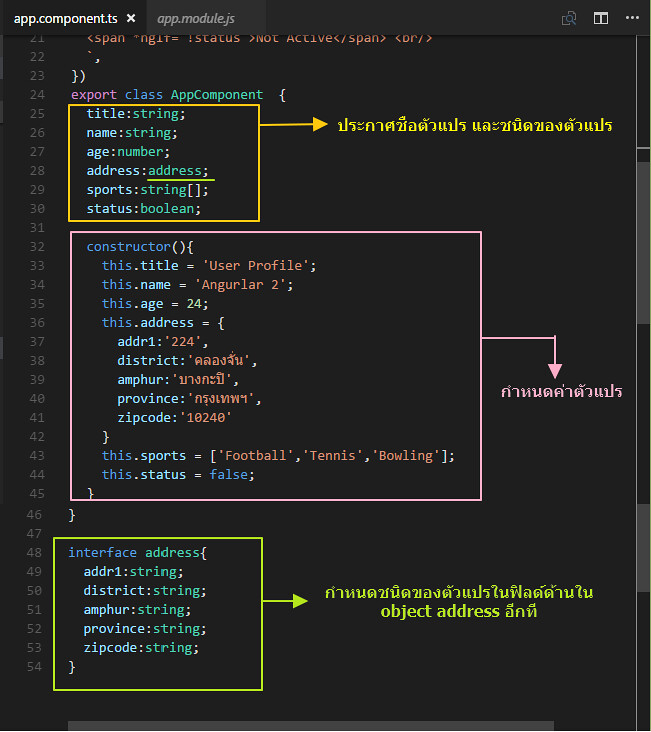
การกำหนดค่าของ Component property ใน Constructor
จากตัวอย่างโค้ดข้างต้น เราได้ทำการกำหนดค่าของตัวแปร เริ่มต้นให้กับ component แล้ว
เรายังสามารถใช้วิธีการประกาศและกำหนดค่าโดยใช้ constructor ได้ ซึ่ง constructor ก็คือ
ฟังก์ชั่นที่ทำงานทันทีเมื่อมีการเรียกใช้ component
เรามาดูตัวอย่างโค้ด แล้วเปรียบเทียบความแตกต่างจากโค้ด้านบนดู
import { Component } from '@angular/core';

@Component({
  selector: 'my-app',
  template: `
  <h3>{{title}}</h3>
  <hr/>
  <strong>Name:</strong> {{name}} <br/>
  <strong>Age:</strong> {{age}} <br/>
  <strong>Address:</strong>
  {{address.addr1}} {{address.district}} {{address.amphur}}
  {{address.province}} {{address.zipcode}} <br/>
  <strong>Sports</strong> <br/>
  <ul>
    <li *ngFor='let sport of sports; let i=index'>
      {{i+1}}. {{sport}}
    </li>
  </ul>
  <strong>Status:</strong>
  <span *ngIf='status'>Active</span>
  <span *ngIf='!status'>Not Active</span> <br/>
  `,
})
export class AppComponent  {
  title:string;
  name:string;
  age:number;
  address:address;
  sports:string[];
  status:boolean;

  constructor(){
    this.title = 'User Profile';
    this.name = 'Angurlar 2';
    this.age = 24;
    this.address = {
      addr1:'224',
      district:'คลองจั่น',
      amphur:'บางกะปิ',
      province:'กรุงเทพฯ',
      zipcode:'10240'
    }
    this.sports = ['Football','Tennis','Bowling'];
    this.status = false;
  }
}

interface address{
  addr1:string;
  district:string;
  amphur:string;
  province:string;
  zipcode:string;
}
ที่เพิ่มเติมเข้ามาคือมีการกำหนด ชนิดของตัวแปร ทำให้ตัวแปรนั้นๆ มีความเฉพาะเจาะจงมากขึ้น
สามารถนำค่าของตัวแปรไปใช้อย่างถูกต้องตามชนิดของตัวแปรนั้นๆ ใน construtor() มีการใช้ this
ซึ่งหมายถึง componennt class ที่กำลังใช้งานอยู่ โดยใน constructor จะทำการกำหนดค่าให้กับ
ตัวแปร property
สิ่งที่เพิ่มเข้ามาให้เราสังเกตที่ตัวแปรที่ชื่อ address เนื่องจากเดิมตัวแปร address เป็น object และมี
ฟิลด์ย่อยด้านใน ดังนั้นเพื่อให้รูปแบบของฟิลด์ย่อยมีการกำหนดชนิดข้อมูลที่ถูกต้อง จึงมีการใช้งาน
interface ซึ่งเป็นรูปแบบของ TypeScript ในการเข้ามาใช้ระบุชนิดของข้อมูลในฟิลด์ด้านใน object อีกที
โดยคำสั่ง interface จะกำหนดไว้ด้านนอก component class
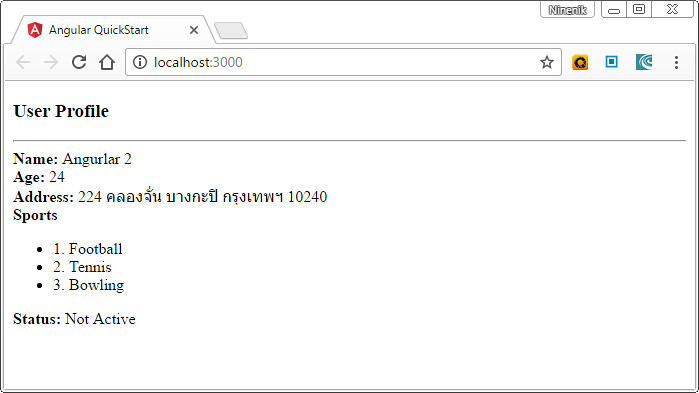
ตัวอย่างผลลัพธ์ ของไฟล์ตัวอย่าง
รายละเอียดเกี่ยวกับการใช้งาน template และการแสดงข้อมูลยังมีรายละเอียดอีกมาก
ยังไงรอติดตามเนื้อหาตอนต่อไป
 อ่านต่อที่บทความ
 เนื้อหาที่เกี่ยวข้อง