
ต่อเนื่องจากเนื้อหาตอนที่แล้ว เนื้อหานี้เราจะมาดูเกี่ยวกับ
widget ที่ให้เราสามารถทำการโหลดข้อมูลใหม่หรือ refresh ข้อมูล
ดึงข้อมูลจาก server ใหม่ในรูปแบบ pull to refresh หรือการปัดจากขอบ
ด้านบนกรณีไม่สามารถเลื่อน scroll ได้แล้ว เป็น widget ที่ชื่อว่า
RefreshIndicator widget เนื้อหานี้อธิบายต่อเนื่องโดยใช้โค้ดจากบทความ
ตอนที่แล้ว
การใช้งาน Card Widget ร่วมกับ ListView ใน Flutter https://www.ninenik.com/content.php?arti_id=1039
https://www.ninenik.com/content.php?arti_id=1039 via @ninenik
*เนื้อหานี้ใช้เนื้อหาต่อเนื่องจากบทความ https://www.ninenik.com/content.php?arti_id=961
การใช้งาน RefreshIndicator
เราน่าจะคุ้นหรือรู้จักกับรูปแบบการปัดจากขอบหน้าจอด้านบนลงมา เพื่อทำการโหลดข้อมูลใหม่
หรือการรีเฟรชข้อมูล ซึ่งใน flutter ก็จะใช้ RefreshIndicator เป็นตัวจัดการ มีวิธีการใช้งาน
ที่ง่ายไม่ซับซ้อน จะใช้ได้กับส่วนของข้อมูลที่สามารถเลื่อนได้ เช่น ListView เมื่อเราปัดลงเพื่อเลื่อนมา
จนถึงด้านบนสุด ก็จะไม่สามารถเลื่อนได้ เมื่อเราลากลง หรือปัดลงมาเพื่อพยายามเลื่อน ก็จะมีตัว
indicatior แสดงขึ้นมา และถ้าเราลากยาวลงมาอีกถึงจุดๆ หนึ่ง พอที่จะไปเรียกฟังก์ชั่นทำงาน โดยตัว
ฟังก์ชั่นจะคืนค่าเป็นข้อมูล Future<void> เมื่อรอสักครู่หรือจนกว่าตัวฟังก์ชั่นจะคืนค่ากลับมาแล้ว ตัว
indicator ก็จะหายไป และข้อมูลที่โหลดใหม่ก็จะมาแสดงแทนที่
ก่อนลงรายละเอียด มาดูโค้ดส่วนของหน้า home บางส่วนจากตอนที่แล้ว เอามาเฉพาะส่วนของ
_HomeState เท่านั้น
class _HomeState extends State<Home> {

    // กำนหดตัวแปรข้อมูล articles
    late Future<List<Article>> articles;

    @override
    void initState() {
      print("initState"); // สำหรับทดสอบ
      super.initState();
      articles = fetchArticle();
    }

    void _refreshData(){
      setState(() {
        print("setState"); // สำหรับทดสอบ
       articles = fetchArticle();
      });
    }

    @override
    Widget build(BuildContext context) {
        print("build");  // สำหรับทดสอบ
        return Scaffold(
            appBar: AppBar(
                title: Text('Home'),
            ),
            body: Center(
              child: FutureBuilder<List<Article>>( // ชนิดของข้อมูล
                future: articles, // ข้อมูล Future
                builder: (context, snapshot) {
                  print("builder");  // สำหรับทดสอบ
                  print(snapshot.connectionState); // สำหรับทดสอบ
                  // กรณีสถานะเป็น waiting ยังไม่มีข้อมูล แสดงตัว loading
                  if (snapshot.connectionState == ConnectionState.waiting){
                      return const CircularProgressIndicator();
                  }
                  // มีข้อมูล และต้องเป็น done ถึงจะแสดงข้อมูล ถ้าไม่ใช่ ก็แสดงตัว loading
                  if (snapshot.hasData &&  snapshot.connectionState == ConnectionState.done) {
                      return Column(
                          children: [
                            Container( // สร้างส่วน header ของลิสรายการ
                              padding: const EdgeInsets.all(5.0),
                              decoration: BoxDecoration(
                                color: Colors.teal.withAlpha(100),
                              ),
                              child: Row(
                                children: [
                                  Text('Total ${snapshot.data!.length} items'), // แสดงจำนวนรายการ
                                ],
                              ),
                            ),
                              Expanded( // ส่วนของลิสรายการ
                                  child: snapshot.data!.length > 0 // กำหนดเงื่อนไขตรงนี้
                                  ? ListView.separated( // กรณีมีรายการ แสดงปกติ
                                          itemCount: snapshot.data!.length,
                                          itemBuilder: (context, index) {
                                            Article article = snapshot.data![index];

                                            Widget card; // สร้างเป็นตัวแปร
                                            card = Card(
                                              margin: const EdgeInsets.all(5.0), // การเยื้องขอบ
                                              child: Column(
                                                children: [
                                                  ListTile(
                                                    title: Text(article.title),
                                                  ),
                                                  const Divider(),
                                                  Row(
                                                    mainAxisAlignment: MainAxisAlignment.start,
                                                    children: <Widget>[
                                                      TextButton(
                                                        child: const Text('Like'),
                                                        onPressed: () {/* ... */},
                                                      ),
                                                      const SizedBox(width: 8),
                                                      TextButton(
                                                        child: const Text('Comment'),
                                                        onPressed: () {/* ... */},
                                                      ),
                                                      const SizedBox(width: 8),
                                                      Expanded(
                                                        child: Container(
                                                          color: Colors.green.withAlpha(50),
                                                          alignment: Alignment.centerRight,
                                                          child: TextButton(
                                                            child: const Text('Share'),
                                                            onPressed: () {/* ... */},
                                                          ),
                                                        ),
                                                      ),
                                                    ],
                                                  ),
                                                ],
                                              )
                                            );
                                            return card;
                                          },
                                          separatorBuilder: (BuildContext context, int index) => const SizedBox(),
                                    )
                                  : const Center(child: Text('No items')), // กรณีไม่มีรายการ
                              ),
                          ],
                        );
                  } else if (snapshot.hasError) { // กรณี error
                    return Text('${snapshot.error}');
                  }
                  // กรณีสถานะเป็น waiting ยังไม่มีข้อมูล แสดงตัว loading
                  return const CircularProgressIndicator();
                },
              ),
            ),
            floatingActionButton: FloatingActionButton( // ปุ่มทดสอบสำหรับดึงข้อมูลซ้ำ
                onPressed: _refreshData,
                child: const Icon(Icons.refresh),
            ),
        );
    }

}
เราจะมาดูและแก้ไขเฉพาะในส่วนนี้เท่านั้น ตัวอย่างหน้าผลลัพธ์ที่ได้

จะเห็นว่าโค้ดเดิม เรามีการใช้งาน floatingActionButton สำหรับทำปุ่มรีเฟรชข้อมูล และมีการกำหนด
ฟังก์ชั่น ชื่อว่า _refreshData() เราจะตัดสองส่วนนี้ไป และจะใช้เป็นวิธีการรีเฟรชแบบใหม่แทน
ในการรีเฟรชข้อมูล หรือขณะกำลังรอข้อมูล จะมีตัวที่แสดงสถานะการดำเนินการอยู่ เรียกว่า Progress Indicator
ในตัวอย่างด้านบนเราใช้เป็นรูปแบบวงกลม ยังมีรูปแบบ Progress Indicator อีกสองรูปแบบที่จะแนะนำ คือ
แบบ รวมตัวที่แสดงแบบวงกลมด้วย
CircularProgressIndicator(); // แบบวงกลม
RefreshProgressIndicator(); // แบบตัวรีเฟรช
LinearProgressIndicator(); // แบบแถบเส้น
แต่ละตัวสามารถกำหนดค่าต่างๆ เพิ่มเติม ในที่นี้เราจะไม่พูดถึง จะใช้ค่าเริ่มต้นเท่านั้น คือไม่กำหนดค่าอะไร
เพิ่ม ดูผลลัพธ์และหน้าตาของตัว progress แต่ละตัว

โค้ดของเราเดิมใช้เป็นแบบแรกอยู่ คือแบบวงกลม สำหรับแบบวงกลม และแบบรีเฟรช มักจะแสดงไว้ตรงกลาง
ของหน้าจอขณะทำงาน ส่วนแบบแถบเส้น จะนิยมแสดงชิดขอบด้านบน
เมื่อเราใช้งาน RefreshIndicator เราก็จะเปลี่ยนตัว progress มาเป็น RefreshProgressIndicator() แทนด้วย
รูปแบบการใช้งาน RefreshIndicator
RefreshIndicator(
  onRefresh: _refresh,
  child: ListView()
)
การใช้งานก็คือเอาตัว RefreshIndicator ไปครอบส่วนของ ListView และกำหนดฟังก์ชั่น ให้กับ onRefresh
เราจะมาเริ่มประยุกต์กับโค้ดเก่าของเรา ดังนี้
void _refreshData(){
  setState(() {
    articles = fetchArticle();
  });
}
ฟังก์ชั่นนี้เป็นตัวเก่าที่เราใช้กับปุ่ม refresh เดิม เราจะลบออก แล้วตั้งชื่อใหม่ เป็น _refresh และคืนค่าเป็น
ข้อมูล Future<void> ก็จะได้ฟังก์ชั่นใหม่เป็นดังนี้
Future<void> _refresh() async {
  setState(() {
    articles = fetchArticle();
  });
}
เราได้ฟังก์ชั่นสำหรับ refresh ข้อมูลที่เป็น Future สำหรับใช้งานใน RefreshIndicator แล้วที่เหลือก็นำตัว
RefreshIndicator มาใช้งาน ก็จะได้เป็นดังนี้
class _HomeState extends State<Home> {

    // กำนหดตัวแปรข้อมูล articles
    late Future<List<Article>> articles;

    @override
    void initState() {
      super.initState();
      articles = fetchArticle();
    }

    Future<void> _refresh() async {
      setState(() {
       articles = fetchArticle();
      });
    }

    @override
    Widget build(BuildContext context) {
        return Scaffold(
            appBar: AppBar(
                title: Text('Home'),
            ),
            body: Center(
              child: FutureBuilder<List<Article>>( // ชนิดของข้อมูล
                future: articles, // ข้อมูล Future
                builder: (context, snapshot) {
                  // มีข้อมูล และต้องเป็น done ถึงจะแสดงข้อมูล ถ้าไม่ใช่ ก็แสดงตัว loading
                  if (snapshot.hasData &&  snapshot.connectionState == ConnectionState.done) {
                      return Column(
                          children: [
                            Container( // สร้างส่วน header ของลิสรายการ
                              padding: const EdgeInsets.all(5.0),
                              decoration: BoxDecoration(
                                color: Colors.orange.withAlpha(100),
                              ),
                              child: Row(
                                children: [
                                  Text('Total ${snapshot.data!.length} items'), // แสดงจำนวนรายการ
                                ],
                              ),
                            ),
                            Expanded( // ส่วนของลิสรายการ
                                child: snapshot.data!.isNotEmpty // กำหนดเงื่อนไขตรงนี้
                                ? RefreshIndicator(
                                  onRefresh: _refresh,
                                  child: ListView.separated( // กรณีมีรายการ แสดงปกติ
                                        itemCount: snapshot.data!.length,
                                        itemBuilder: (context, index) {
                                          Article article = snapshot.data![index];

                                          Widget card; // สร้างเป็นตัวแปร
                                          card = Card(
                                            margin: const EdgeInsets.all(5.0), // การเยื้องขอบ
                                            child: Column(
                                              children: [
                                                ListTile(
                                                  title: Text(article.title),
                                                ),
                                                const Divider(),
                                                Row(
                                                  mainAxisAlignment: MainAxisAlignment.start,
                                                  children: <Widget>[
                                                    TextButton(
                                                      child: const Text('Like'),
                                                      onPressed: () {/* ... */},
                                                    ),
                                                    const SizedBox(width: 8),
                                                    TextButton(
                                                      child: const Text('Comment'),
                                                      onPressed: () {/* ... */},
                                                    ),
                                                    const SizedBox(width: 8),
                                                    Expanded(
                                                      child: Container(
                                                        color: Colors.orange.withAlpha(50),
                                                        alignment: Alignment.centerRight,
                                                        child: TextButton(
                                                          child: const Text('Share'),
                                                          onPressed: () {/* ... */},
                                                        ),
                                                      ),
                                                    ),
                                                  ],
                                                ),
                                              ],
                                            )
                                          );
                                          return card;
                                        },
                                        separatorBuilder: (BuildContext context, int index) => const SizedBox(),
                                  ),
                                )
                                : const Center(child: Text('No items')), // กรณีไม่มีรายการ
                            ),
                          ],
                        );
                  } else if (snapshot.hasError) { // กรณี error
                    return Text('${snapshot.error}');
                  }
                  // กรณีสถานะเป็น waiting ยังไม่มีข้อมูล แสดงตัว loading
                  return const RefreshProgressIndicator();
                },
              ),
            ),
        );
    }

}
ผลลัพธ์ที่ได้
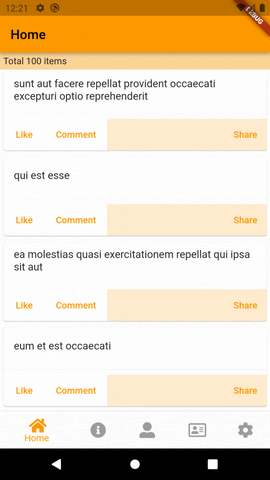
จะเห็นว่าตอนนี้ไม่มีปุ่มรีเฟรช มาบังเนื้อหาแล้ว เราสามารถทำการ รีเฟรช โดยปัดลากลงมาจากขอบด้าน
บนของหน้าจอ เมื่อกำลังทำการโหลดข้อมูลใหม่ ตัว RefreshProgressIndicator ก็จะแสดงสถานะกำลัง
ดำเนินการอยู่ จนกว่าข้อมูลจะส่งกลับมา แล้วก็จะหายไปพร้อมแสดงข้อมูลใหม่
เราจะมาประยุกต์การทำงานเพิ่มเติม และรู้จักกับ widget เพิ่ม โดยสิ่งที่ต้องการคือ เมื่อเปิดมาครั้งแรก
ก็แสดงปกติเหมือนโค้ดด้านบน มีการโหลดข้อมูล และตัว RefreshProgressIndicator แสดงตรงกลางหน้า
จอ app แต่เมื่อโหลดข้อมูล และทำการรีเฟรช สิ่งที่เป็นอยู่คือ หน้าจอก็จะมีตัว RefreshProgressIndicator
อยู่ตรงกลางเหมือนเดิม พร้อมข้อมูลที่โหลดมาครั้งแรกหายไป เราต้องการให้ข้อมูลเดิมยังแสดงอยู่ แต่ให้มี
ตัว LinearProgressIndicator หรือตัว progress แบบแถบเส้นแสดงด้านบนเนื้อหาเดิม เพื่อจะบอกว่า ตอนนี้
กำลังโหลดข้อมูลใหม่ เพื่อไม่ให้หน้าจอโล่ง ขณะเดียวกัน ถ้ากำลังโหลดอยู่ เราเลื่อน scroll มาตำแหน่งอื่น
ก็จะให้เลื่อนกลับมาด้านบนเมื่อโหลดข้อมูลเสร็จ แบบนี้ที่ต้องการ สิ่งที่เราจะต้องใช้งานมี 3 ส่วนคือ เราจะ
เพิ่มตัว LinearProgressIndicator เข้ามาในกรณีที่มีข้อมูลเดิมแล้ว และกำลังโหลดข้อมูลใหม่ โดยที่ตัว
LinearProgressIndicator นี้จะแสดงก็ต่อเมื่อเข้าเงื่อนไข เราจะใช้ Visibility widget ซ่อนหรือแสดงตัว
progress นี้ และสุดท้าย เราจะใช้ ScrollController เพื่อควบคุมการเลื่อนตำแหน่งของ ListView
จะขอแยกส่วนโค้ดที่จะเพิ่มมาอธิบายดังนี้
// ตัว ScrollController สำหรับจัดการการ scroll ใน ListView
final ScrollController _scrollController = ScrollController();
เราสร้าง property สำหรับจัดการกับการ scroll ของ ListView
....
child: ListView.separated( // กรณีมีรายการ แสดงปกติ
      controller: _scrollController, // กำนหนด controller ที่จะใช้งานร่วม
      itemCount: snapshot.data!.length,
      itemBuilder: (context, index) {
....
ต่อไปในส่วนของ ListView เราก็กำหนด controller ที่จะใช้งาน
จัดการเงื่อนไขการแสดงข้อมูล จากเดิม
if (snapshot.hasData && snapshot.connectionState == ConnectionState.done) {
เงื่อนไขนี้เป็นเงื่อนไขเดิม ที่เมื่อจะแสดงข้อมูลในเงื่อนไขนี้ ก็ต่อเมื่อมีข้อมูลและมีสถานะเป้น done
แล้วเท่านั้น นั่นหมายความว่า เงื่อนไขนี้ จะไม่มีทางแสดงข้อมูลเก่าที่โหลดมาครั้งแรก เพราะทุกครั้งที่โหลด
ใหม่ ก็จะมีสถานะเป็น waiting เราจะเปลี่ยนให้สามารถแสดงข้อมูลเก่าก่อน ก็จะให้เหลือเป็น
if (snapshot.hasData) { // จะตรวจสอบแค่มีข้อมูลก่อน
นั่นคือแค่มีข้อมูลครั้งแรก ตัวข้อมูลเก่าก็จะยังแสดงค้างอยู่ เราค่อยเอาเงื่อนไข ConnectionState เข้า
ไปตรวจสอบต่อด้านในอีกที ดังนี้
bool _visible = false; // กำหนดสถานะการแสดง หรือมองเห็น เป็นไม่แสดง
if(snapshot.connectionState == ConnectionState.waiting){ // เมื่อกำลังรอข้อมูล
  _visible = true; // เปลี่ยนสถานะเป็นแสดง
}
if(_scrollController.hasClients){ //เช็คว่ามีตัว widget ที่ scroll ได้หรือไม่ ถ้ามี
  // เลื่อน scroll มาด้านบนสุด
_scrollController.animateTo(0, duration: Duration(milliseconds: 500), curve: Curves.fastOutSlowIn);
}
เรากำหนดตัวแปรให้กับสถานะการแสดงตัว progress ตามเงื่อนไขของ ConnectionState คือทุกครั้งที่มี
การรีเฟรชข้อมูลใหม่ เราจะให้ตัว progress นี้แสดงด้านบน ต่อด้วย ถ้ามีข้อมูลใหม่ส่งกลับมาแล้ว
เราจะให้ทำงานส่วนของ scrollController ให้เลื่อนรายการไปไว้ด้านบน
สุดท้ายแทรกการใช้งาน Visibility widget เพื่อแสดง LinearProgressIndicator ด้านบนลิสรายการ ดังนี้
Visibility(
  child: const LinearProgressIndicator(),
  visible: _visible,
),
มาดูโค้ดแบบเต็ม และผลลัพธ์การทำงาน
ไฟล์ home.dart
import 'dart:async';
import 'dart:convert';

import 'package:flutter/material.dart';
import 'package:flutter/foundation.dart';
import 'package:http/http.dart' as http;

class Home extends StatefulWidget {
    static const routeName = '/';

    const Home({Key? key}) : super(key: key);

    @override
    State<StatefulWidget> createState() {
        return _HomeState();
    }
}

class _HomeState extends State<Home> {

    // กำนหดตัวแปรข้อมูล articles
    late Future<List<Article>> articles;
    // ตัว ScrollController สำหรับจัดการการ scroll ใน ListView
    final ScrollController _scrollController = ScrollController();

    @override
    void initState() {
      super.initState();
      articles = fetchArticle();
    }

    Future<void> _refresh() async {
      setState(() {
       articles = fetchArticle();
      });
    }

    @override
    Widget build(BuildContext context) {
        return Scaffold(
            appBar: AppBar(
                title: Text('Home'),
            ),
            body: Center(
              child: FutureBuilder<List<Article>>( // ชนิดของข้อมูล
                future: articles, // ข้อมูล Future
                builder: (context, snapshot) {
                  // มีข้อมูล และต้องเป็น done ถึงจะแสดงข้อมูล ถ้าไม่ใช่ ก็แสดงตัว loading
                  if (snapshot.hasData) {
                      bool _visible = false; // กำหนดสถานะการแสดง หรือมองเห็น เป็นไม่แสดง
                      if(snapshot.connectionState == ConnectionState.waiting){ // เมื่อกำลังรอข้อมูล
                        _visible = true; // เปลี่ยนสถานะเป็นแสดง
                      }
                      if(_scrollController.hasClients){ //เช็คว่ามีตัว widget ที่ scroll ได้หรือไม่ ถ้ามี
                        // เลื่อน scroll มาด้านบนสุด
                      _scrollController.animateTo(0, duration: Duration(milliseconds: 500), curve: Curves.fastOutSlowIn);
                      }
                      return Column(
                          children: [
                            Visibility(
                              child: const LinearProgressIndicator(),
                              visible: _visible,
                            ),
                            Container( // สร้างส่วน header ของลิสรายการ
                              padding: const EdgeInsets.all(5.0),
                              decoration: BoxDecoration(
                                color: Colors.orange.withAlpha(100),
                              ),
                              child: Row(
                                children: [
                                  Text('Total ${snapshot.data!.length} items'), // แสดงจำนวนรายการ
                                ],
                              ),
                            ),
                            Expanded( // ส่วนของลิสรายการ
                                child: snapshot.data!.isNotEmpty // กำหนดเงื่อนไขตรงนี้
                                ? RefreshIndicator(
                                  onRefresh: _refresh,
                                  child: ListView.separated( // กรณีมีรายการ แสดงปกติ
                                        controller: _scrollController, // กำนหนด controller ที่จะใช้งานร่วม
                                        itemCount: snapshot.data!.length,
                                        itemBuilder: (context, index) {
                                          Article article = snapshot.data![index];

                                          Widget card; // สร้างเป็นตัวแปร
                                          card = Card(
                                            margin: const EdgeInsets.all(5.0), // การเยื้องขอบ
                                            child: Column(
                                              children: [
                                                ListTile(
                                                  title: Text(article.title),
                                                ),
                                                const Divider(),
                                                Row(
                                                  mainAxisAlignment: MainAxisAlignment.start,
                                                  children: <Widget>[
                                                    TextButton(
                                                      child: const Text('Like'),
                                                      onPressed: () {/* ... */},
                                                    ),
                                                    const SizedBox(width: 8),
                                                    TextButton(
                                                      child: const Text('Comment'),
                                                      onPressed: () {/* ... */},
                                                    ),
                                                    const SizedBox(width: 8),
                                                    Expanded(
                                                      child: Container(
                                                        color: Colors.orange.withAlpha(50),
                                                        alignment: Alignment.centerRight,
                                                        child: TextButton(
                                                          child: const Text('Share'),
                                                          onPressed: () {/* ... */},
                                                        ),
                                                      ),
                                                    ),
                                                  ],
                                                ),
                                              ],
                                            )
                                          );
                                          return card;
                                        },
                                        separatorBuilder: (BuildContext context, int index) => const SizedBox(),
                                  ),
                                )
                                : const Center(child: Text('No items')), // กรณีไม่มีรายการ
                            ),
                          ],
                        );
                  } else if (snapshot.hasError) { // กรณี error
                    return Text('${snapshot.error}');
                  }
                  // กรณีสถานะเป็น waiting ยังไม่มีข้อมูล แสดงตัว loading
                 return const RefreshProgressIndicator();
                },
              ),
            ),
        );
    }

}

// สรัางฟังก์ชั่นดึงข้อมูล คืนค่ากลับมาเป็นข้อมูล Future ประเภท List ของ Article
Future<List<Article>> fetchArticle() async {
  // ทำการดึงข้อมูลจาก server ตาม url ที่กำหนด
  final response = await http
      .get(Uri.parse('https://jsonplaceholder.typicode.com/posts'));

  // เมื่อมีข้อมูลกลับมา
  if (response.statusCode == 200) {
    // ส่งข้อมูลที่เป็น JSON String data ไปทำการแปลง เป็นข้อมูล List<Article
    // โดยใช้คำสั่ง compute ทำงานเบื้องหลัง เรียกใช้ฟังก์ชั่นชื่อ parseArticles
    // ส่งข้อมูล JSON String data ผ่านตัวแปร response.body
    return compute(parseArticles, response.body);
  } else { // กรณี error
    throw Exception('Failed to load article');
  }
}

// ฟังก์ชั่นแปลงข้อมูล JSON String data เป็น เป็นข้อมูล List<Article>
List<Article> parseArticles(String responseBody) {
  final parsed = jsonDecode(responseBody).cast<Map<String, dynamic>>();
  return parsed.map<Article>((json) => Article.fromJson(json)).toList();
}

// Data models
class Article {
  final int userId;
  final int id;
  final String title;
  final String body;

  Article({
    required this.userId,
    required this.id,
    required this.title,
    required this.body,
  });

  // ส่วนของ name constructor ที่จะแปลง json string มาเป็น Article object
  factory Article.fromJson(Map<String, dynamic> json) {
    return Article(
      userId: json['userId'],
      id: json['id'],
      title: json['title'],
      body: json['body'],
    );
  }

}
ผลลัพธ์
เราสามารถปรับแต่งตำแหน่งของตัว progress ต่างๆ ได้โดยใช้ Align widget ตัวอย่างเช่น
const Align(
  alignment: Alignment.topCenter, // ไว้ตรงกลางด้านบน
  child: LinearProgressIndicator(
    backgroundColor: Colors.yellow, // กำหนดสีพื้นหลัง
    valueColor: AlwaysStoppedAnimation<Color>(Colors.red), // กำหนดสีข้อมูล
  ),
),
เกี่ยวกับการปรับแต่งตัว ProgressIndicator และ Widget ต่างๆ แต่ละตัวสามารถดูการกำหนดค่าเพิ่มเติมได้ที่ลิ้งค์ API
แต่ละตัวดังนี้
CircularProgressIndicator(); // แบบวงกลม
RefreshProgressIndicator(); // แบบตัวรีเฟรช
หวังว่าเนื้อหาจากบทความนี้จะเป็นประโยชน์ในการนำไปปรับประยุกต์ใช้ หรือทำความเข้าใจต่อไป
เนื้อหาในตอนหน้าจะเป็นอะไรรอติดตาม
 อ่านต่อที่บทความ
 เนื้อหาที่เกี่ยวข้อง