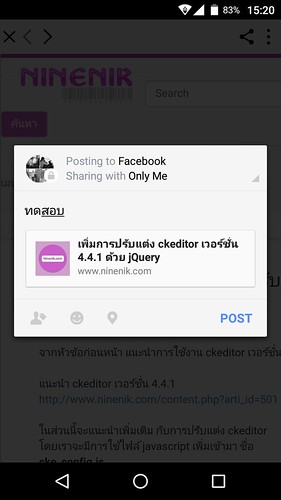
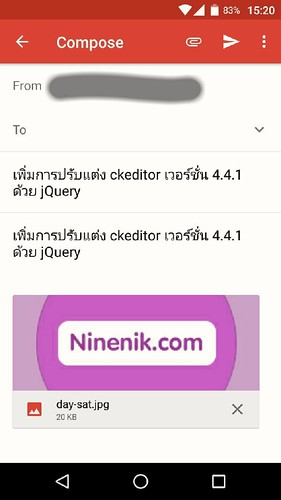
สำหรับเนื้อหาในตอนนี้ จะแสดงวิธีการแชร์ข้อมูลใน app ของเรา ด้วย plugin ที่ชื่อ
Social Sharing โดยเราสามารถที่แชร์ข้อความอย่างเดียว ข้อความและรูป ข้อความและรูป
และลิ้งค์ เหล่านี้เป็นต้นไปยัง app ต่างๆ ในที่นี้ยกตัวอย่างการแชร์บทความในเว็บไซต์
www.ninenik.com ต่อจากเนื้อหาตอนที่แล้ว
เปิดหน้าเว็บเพจด้วย inapp browser ใน ionic material
https://www.ninenik.com/content.php?arti_id=741 via @ninenik
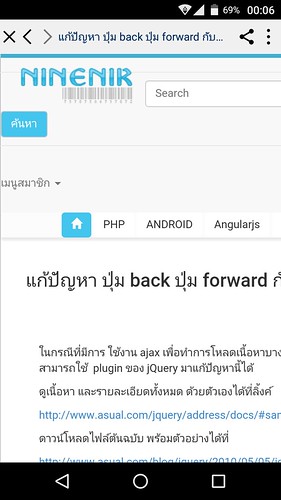
จากตอนที่แล้ว เมื่อเปิดหน้าเว็บเพจผ่าน inapp browser ก็จะมี toolbar ที่เราเพิ่มเข้าไป
ได้แก่ ปุ่ม share และ เมนูแนวตั้ง หลักการของเราก็คือ พอเราคลิกที่เมนูนั้นๆ เราก็จะมาเรียก
ให้ social sharing ทำงาน
ตัวอย่างรูปหน้าเว็บเพจที่เปิดผ่าน inapp browser
ก่อนอื่นให้เราทำการติดตั้ง Social Sharing plugin ก่อน
1. ติดตั้ง Social Sharing plugin
โดยใช้คำสั่ง
C:\phonegap\learn003>cordova plugin add cordova-plugin-x-socialsharing
2. ทำความรู้จักวิธีการใช้งาน Social Sharing plugin
ในเว็บไซต์ http://ngcordova.com/ จะมี plugin ต่างๆ ให้เรานำมาใช้งาน app ionic
บางตัวสามารถนำมาใช้งานได้เลย บางตัวก็ใช้ไม่ได้ ดังนั้นเราต้องลองทดสอบใช้งานดู สามารถ
ศึกษาเพิ่มเติมด้วยตัวเองได้ที่ http://ngcordova.com/docs/plugins/socialSharing/
รูปแบบคำสั่ง
  $cordovaSocialSharing
    .share(message, subject, file, link) // Share via native share sheet
    .then(function(result) {
      // Success!
    }, function(err) {
      // An error occured. Show a message to the user
    });
ตัวแรกนี้ใช้สำหรับแชร์โดยไม่ระบุ app เจาะจง และเป็นการแชร์ผ่าน ระบบแชร์ของเครื่องนั้นๆ
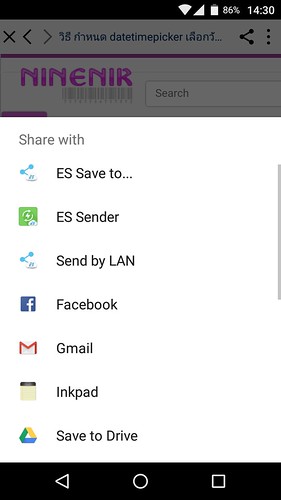
เมื่อเราใช้คำสั่งนี้ จะขึ้นเป็น action sheet หรือรายการคำสั่งว่าจะทำอะไรกับข้อมูลของเราบ้าง
โดยค่าที่สามารถส่งไปได้แก่ ข้อความ หัวข้อ ไฟล์หรือรูป และก็ ลิ้งค์
.share(message, subject, file, link)
message คือข้อความที่ต้องการแชร์ บาง app เช่น facebook , instragram ไม่รองรับ
ข้อความส่วนนี้ โดยเมื่อขึ้นหน้าแชร์ของ app facebook เราต้องกรอกข้อความใหม่เอง
subject คือหัวข้อเรื่อง บาง app มีการใช้ค่านี้เช่น แชร์ผ่าน Email ก็จะใช้หัวข้อเรืองเป็น
หัวข้อจดหมาย
file คือไฟล์ต่างๆ รวมถึงไฟล์รูปที่เราต้องการแชร์ อาจจะเป็น url จากไฟล์ที่อยู่บน server
หรือที่อยู่ใน app ของเราก็ได้ สามารถกำหนดได้หลายไฟล์ โดยรูปแบบต้องกำหนดเป็น array
เช่น ['https://www.google.nl/images/srpr/logo4w.png','www/localimage.png']
link คิดลิ้งค์ url หน้าเว็บเพจที่เราต้อการแชร์
โดยค่าไหนเราไม่ต้องการ ก็ให้กำหนดเป็น null ได้
ดูรายละเอียดการใช้งานเพิ่มเติมได้ที่
ดูรูปประกอบ
คำสั่งการแชร์ในรูปแบบข้างต้น สามรารถใช้รูปแบบนี้แทนได้ แนะนำให้ใช้รูปแบบนี้แทน
var options = {
	message: message, // not supported on some apps (Facebook, Instagram)
	subject: message, // fi. for email
	files: image, // an array of filenames either locally or remotely
	url: e.url,
	chooserTitle: 'Pick an app' // Android only, you can override the default share sheet title
}
$cordovaSocialSharing
	.shareWithOptions(options) // Share via native share sheet
	.then(function(result) {
		alert("Success");
	}, function(err) {
		alert("error");
	});
ดูรูปประกอบ
สำหรับรูปแบบคำสั่ง การแชร์แยกตาม app อื่นๆ จะมีการใช้งานไม่ต่างกัน จะขอนำ
โค้ดตัวอย่างมาแปะไว้ ให้สามารถหยับจับไปใช้งานได้เลย หรือเข้าไปดูการใช้งานได้ที่
  $cordovaSocialSharing
    .share(message, subject, file, link) // Share via native share sheet
    .then(function(result) {
      // Success!
    }, function(err) {
      // An error occured. Show a message to the user
    });

  $cordovaSocialSharing
    .shareViaTwitter(message, image, link)
    .then(function(result) {
      // Success!
    }, function(err) {
      // An error occurred. Show a message to the user
    });

  $cordovaSocialSharing
    .shareViaWhatsApp(message, image, link)
    .then(function(result) {
      // Success!
    }, function(err) {
      // An error occurred. Show a message to the user
    });

  $cordovaSocialSharing
    .shareViaFacebook(message, image, link)
    .then(function(result) {
      // Success!
    }, function(err) {
      // An error occurred. Show a message to the user
    });

  // access multiple numbers in a string like: '0612345678,0687654321'
  $cordovaSocialSharing
    .shareViaSMS(message, number)
    .then(function(result) {
      // Success!
    }, function(err) {
      // An error occurred. Show a message to the user
    });

// toArr, ccArr and bccArr must be an array, file can be either null, string or array
  $cordovaSocialSharing
    .shareViaEmail(message, subject, toArr, ccArr, bccArr, file)
    .then(function(result) {
      // Success!
    }, function(err) {
      // An error occurred. Show a message to the user
    });

  $cordovaSocialSharing
    .canShareVia(socialType, message, image, link)
    .then(function(result) {
      // Success!
    }, function(err) {
      // An error occurred. Show a message to the user
    });

  $cordovaSocialSharing
    .canShareViaEmail()
    .then(function(result) {
      // Yes we can
    }, function(err) {
      // Nope
    });
3. เตรียมข้อมูลที่จะใช้สำหรับ การแชร์ผ่าน Social Sharing plugin
ให้เราเปิดไฟล์ชื่อ article.html ในโฟลเดอร์ templates
โดยในฟังก์ชั่น openurl(url,target) เดิมเราจะส่งแค่ url และ target เข้าไปใน
inapp browser แต่เราจะปรับเพิ่มค่าเข้าไปเป็นดังนี้
ng-click="openurl('{{article.url}}','_blank','{{article.topic}}','{{article.img}}')"
โดยเพิ่มหัวข้อของบทความ และ url รูปของบทความเข้าไปด้วย
จะได้ไฟล์ article.html เป็นดังนี้
<ion-view view-title="Article">
    <ion-nav-buttons side="right">
        <div class="buttons buttons-right header-item">
    <span class="right-buttons">
    <button class="button button-icon button-clear ion-android-more-vertical"> </button>
    </span>
        </div>
    </ion-nav-buttons>
    <ion-content class="stable-bg" ng-class="{expanded:isExpanded}">
        <ion-refresher on-refresh="refresh()"></ion-refresher>
        <div ng-show="!articles.length">
            <div style="text-align: center;">
                <h4>Pull to refresh</h4>
            </div>
        </div>
        <div class="list card light-bg" ng-repeat="article in articles">
            <div class="item item-avatar">
                <img ng-src="{{article.img}}">
                <h2>{{article.topic}}</h2>
                <p>{{article.date}}</p>
            </div>

            <div class="item item-body"
                 ng-click="openurl('{{article.url}}','_blank','{{article.topic}}','{{article.img}}')">
                <img ng-src="{{article.img}}" alt="" style="margin: auto;">
                <p>
                    {{article.description}}
                </p>
                <p>{{article.view}} views</p>

            </div>
        </div>


    </ion-content>
</ion-view>
4. เรียกใช้คำสั่งการแชร์ใน ArticleCtrl controller
ให้เปิดไฟล์ controllers.js ในโฟลเดอร์ js แล้วดูในส่วนของ controller ที่ชื่อ ArticleCtrl
ให้เราดูฟังก์ชั่น openurl เราจะมีการเพิ่ม parameter เพิ่มเข้ามาตามที่ส่งค่ามาจากไฟล์
article.html ในข้อที่ผ่านมา จะได้เป็น
$scope.openurl = function(url, target, message, image){
จากนั้นเราแก้ไข ส่วนของรายการเมนูแนวตั้งใน inapp browser และเปลี่ยนขื่อ
event เป้นชื่อที่เราต้องการ ในที่นี้เราจะใช้เป็น share to facebook กับ share to email
menu: {
	wwwImage: 'img/ic_more_vert_black_48dp.png',
	wwwImagePressed: 'img/ic_more_vert_black_48dp.png',
	wwwImageDensity: 2,
	align: 'right',
	items: [
		{
			event: 'sharetofacebook',
			label: 'Share to facebook!'
		},
		{
			event: 'sharetoemail',
			label: 'Send to Email'
		}
	]
},
และใน event sharetoemail, sharetofacebook และ sharePressed
เราก็แทรกคำสั่งการแชร์เข้าไป ดูตัวอย่างและโค้ดในส่วนของ ArticleCtrl แบบเต็ม
.controller('ArticleCtrl', function(
    $scope, $stateParams, $timeout, ionicMaterialInk, ionicMaterialMotion
    ,$ionicPlatform, ArticleService, $cordovaToast, $cordovaSpinnerDialog
    ,$cordovaSocialSharing) {
    $scope.$parent.showHeader();
    $scope.$parent.clearFabs();
    $scope.$parent.setHeaderFab(false);
    $scope.$parent.hasShadow();

    $timeout(function() {
        $scope.isExpanded = false;
        $scope.$parent.setExpanded(false);
    }, 300);

    // สร้างฟังก์ชั่นสำหรับเรียกใช้ Toast plugin
    $scope.showToast = function(str, duration, position){
        $ionicPlatform.ready(function() { // เตรียมก่อนเรียกใช้ plugin
            return $cordovaToast
                .show(str, duration, position)
                .then(function(success) {
                    // success
                }, function (error) {
                    // error
                });
        });
    };

    // สร้างฟังก์ชั่นสำหรับเปิดเว็บเพจ รับค่า url  target message image
    $scope.openurl = function(url, target, message, image){

        $ionicPlatform.ready(function() { // เตรียมก่อนเรียกใช้ plugin
            // เรียกให้ plugin ทำงานหร้อมปรับแต่งการแสดงผล
            cordova.ThemeableBrowser.open(url, target, {
                statusbar: {
                    color: '#ffffffff'
                },
                toolbar: {
                    height: 44,
                    color: '#f0f0f0ff'
                },
                title: {
                    color: '#003264ff',
                    showPageTitle: true
                },
                backButton: {
                    wwwImage: 'img/ic_chevron_left_black_48dp.png',
                    wwwImagePressed: 'img/ic_chevron_left_black_48dp.png',
                    wwwImageDensity: 2,
                    align: 'left',
                    event: 'backPressed' // กด back ให้ทำงานที่ backPressed
                },
                forwardButton: {
                    wwwImage: 'img/ic_chevron_right_black_48dp.png',
                    wwwImagePressed: 'img/ic_chevron_right_black_48dp.png',
                    wwwImageDensity: 2,
                    align: 'left',
                    event: 'forwardPressed'
                },
                closeButton: {
                    wwwImage: 'img/ic_close_black_48dp.png',
                    wwwImagePressed: 'img/ic_close_black_48dp.png',
                    wwwImageDensity: 2,
                    align: 'left',
                    event: 'closePressed'
                },
                customButtons: [
                    {
                        wwwImage: 'img/ic_share_black_48dp.png',
                        wwwImagePressed: 'img/ic_share_black_48dp.png',
                        wwwImageDensity: 2,
                        align: 'right',
                        event: 'sharePressed'
                    }
                ],
                menu: {
                    wwwImage: 'img/ic_more_vert_black_48dp.png',
                    wwwImagePressed: 'img/ic_more_vert_black_48dp.png',
                    wwwImageDensity: 2,
                    // title: 'Test',
                    // cancel: 'Cancel',
                    align: 'right',
                    items: [
                        {
                            event: 'sharetofacebook',
                            label: 'Share to facebook!'
                        },
                        {
                            event: 'sharetoemail',
                            label: 'Send to Email'
                        }
                    ]
                },
                backButtonCanClose: true
            }).addEventListener('backPressed', function(e) {
                $scope.showToast('ทำการกดปุ่ม Back', 'long', 'bottom');
            }).addEventListener('forwardPressed', function(e) {
                $scope.showToast('ทำการกดปุ่ม forward', 'long', 'bottom');
            }).addEventListener('sharetofacebook', function(e) {
                $scope.showToast('Share to facebook', 'long', 'bottom');

                $cordovaSocialSharing
                    .shareViaFacebook(message, null, e.url)
                    .then(function(result) {
                        alert("Success");
                    }, function(err) {
                        alert("error");
                    });
            }).addEventListener('sharetoemail', function(e) {
                $scope.showToast('Share to Email', 'long', 'bottom');
                $cordovaSocialSharing
                    .shareViaEmail(message, message, [], [], [], image)
                    .then(function(result) {
                        alert("Success");
                    }, function(err) {
                        alert("error");
                    });
            }).addEventListener('sharePressed', function(e) {
                $scope.showToast('ทำการกดปุ่ม share URL=' + e.url, 'long', 'bottom');

                var options = {
                    message: message, // not supported on some apps (Facebook, Instagram)
                    subject: message, // fi. for email
                    files: image, // an array of filenames either locally or remotely
                    url: e.url,
                    chooserTitle: 'Pick an app' // Android only, you can override the default share sheet title
                }
                $cordovaSocialSharing
                    .shareWithOptions(options) // Share via native share sheet
                    .then(function(result) {
                        alert("Success");
                    }, function(err) {
                        alert("error");
                    });
            }).addEventListener(cordova.ThemeableBrowser.EVT_ERR, function(e) {
                $scope.showToast('แจ้ง error:' +e.message, 'long', 'bottom');
            }).addEventListener(cordova.ThemeableBrowser.EVT_WRN, function(e) {
                $scope.showToast('เตือน warning:' +e.message, 'long', 'bottom');
            });

        });

    };


    // กำหนดตัวแปร สำหรับไว้รับค่าข้อมูลบทความ
    $scope.articles = [];


     // สร้างฟังก์ชั่นสำหรับไปดึงข้อมูลจาก server
    $scope.refresh = function(){
        $ionicPlatform.ready(function() { // เตรียมก่อนเรียกใช้ plugin
            // เรียกใช้ ArticleService ให้ทำงานฟังก์ชั่น getArticle
            ArticleService.getArticle()
                .then(function (response) {
                    $cordovaSpinnerDialog.hide();
                    // นำผลลัพธ์ที่ได้เก็บในตัวแปร $scope.articles
                    $scope.articles = response;
                    // ซ่อนหลังจาก ข้อมูลแสดงแล้ว
                    $scope.$broadcast("scroll.refreshComplete");
                });
        });
    };

    // เราจะให้ทำการโหลดข้อมลเมื่อเข้ามาหน้า article แต่แรก
    // และให้แสดง loading
    $ionicPlatform.ready(function() { // เตรียมก่อนเรียกใช้ plugin
        // แสดง spin dialog plugin จะใช้หรือไม่ก็ได้ นำมาใช้เผื่อใครไปประยุกต์เพิ่ม
        $cordovaSpinnerDialog.show(null,"รอสักครู่..กำลังโหลดข้อมูล"); // แสดง loading
        $scope.refresh();
    });


    ionicMaterialMotion.fadeSlideInRight();

    ionicMaterialInk.displayEffect();

})
5. ทำการ build apk ไฟล์แล้วนำไปทดสอบติดตั้งบนมือถือ
ด้วยคำสั่ง
C:\phonegap\learn003>phonegap build android
ให้ทำการทดสอบติดตั้งในมือถือ android ของเรา จะได้หน้าตา app ประมาณนี้
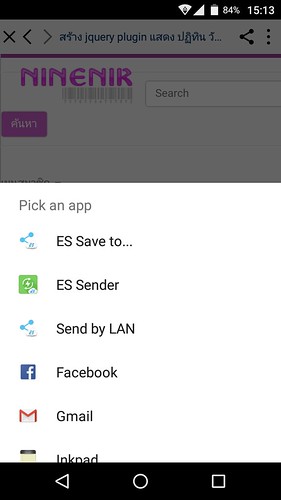
ตัวอย่าง action sheet แสดงเมื่อกด icon แชร์ และหน้าตา การแชร์ข้อมูลผ่น facebook
และ ผ่าน Email

