
เนื้อหานี้ต่อจากตอนที่แล้ว
ศึกษาและใช้งาน ionic material จาก demo เบื้องต้น
https://www.ninenik.com/content.php?arti_id=696 via @ninenik
จริงๆ แล้วเนื้อหาส่วนนี้จะมีอยู่ในบทความเก่า เกี่ยวกับ navigation และ template
การใช้งาน navigation ใน ionicframework ตอนที่ 5
https://www.ninenik.com/content.php?arti_id=541 via @ninenik
สามารถย้อนกลับไปศึกษาเพิ่มเติมได้ แต่ในที่นี้
เราจะทำการศึกษาาจากไฟล์ demo ว่ามีการทำงาน การประยุกต์ และมีรูปแบบที่น่า
เอามาต่อยอดได้เป็นอย่างไรบ้าง
มาดูโครงสร้างของ demo จากเนื้อหาตอนที่แล้ว
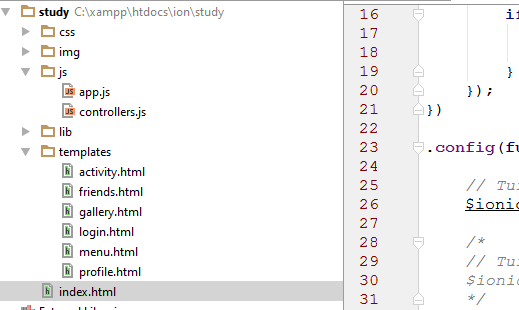
จากรูป เราจะสนใจในส่วนของไฟล์ app.js controller.js
และก็ไฟล์ในส่วนของ template
ไฟล์ app.js ตัด comment ออก
angular.module('starter', ['ionic', 'starter.controllers', 'ionic-material', 'ionMdInput'])

.run(function($ionicPlatform) {
    $ionicPlatform.ready(function() {
        if (window.cordova && window.cordova.plugins.Keyboard) {
            cordova.plugins.Keyboard.hideKeyboardAccessoryBar(true);
        }
        if (window.StatusBar) {
            StatusBar.styleDefault();
        }
    });
})

.config(function($stateProvider, $urlRouterProvider, $ionicConfigProvider) {
    $ionicConfigProvider.views.maxCache(0);

    $stateProvider.state('app', {
        url: '/app',
        abstract: true,
        templateUrl: 'templates/menu.html',
        controller: 'AppCtrl'
    })

    .state('app.activity', {
        url: '/activity',
        views: {
            'menuContent': {
                templateUrl: 'templates/activity.html',
                controller: 'ActivityCtrl'
            },
            'fabContent': {
                template: '<button id="fab-activity" class="button button-fab button-fab-top-right expanded button-energized-900 flap"><i class="icon ion-paper-airplane"></i></button>',
                controller: function ($timeout) {
                    $timeout(function () {
                        document.getElementById('fab-activity').classList.toggle('on');
                    }, 200);
                }
            }
        }
    })

    .state('app.friends', {
        url: '/friends',
        views: {
            'menuContent': {
                templateUrl: 'templates/friends.html',
                controller: 'FriendsCtrl'
            },
            'fabContent': {
                template: '<button id="fab-friends" class="button button-fab button-fab-top-left expanded button-energized-900 spin"><i class="icon ion-chatbubbles"></i></button>',
                controller: function ($timeout) {
                    $timeout(function () {
                        document.getElementById('fab-friends').classList.toggle('on');
                    }, 900);
                }
            }
        }
    })

    .state('app.gallery', {
        url: '/gallery',
        views: {
            'menuContent': {
                templateUrl: 'templates/gallery.html',
                controller: 'GalleryCtrl'
            },
            'fabContent': {
                template: '<button id="fab-gallery" class="button button-fab button-fab-top-right expanded button-energized-900 drop"><i class="icon ion-heart"></i></button>',
                controller: function ($timeout) {
                    $timeout(function () {
                        document.getElementById('fab-gallery').classList.toggle('on');
                    }, 600);
                }
            }
        }
    })

    .state('app.login', {
        url: '/login',
        views: {
            'menuContent': {
                templateUrl: 'templates/login.html',
                controller: 'LoginCtrl'
            },
            'fabContent': {
                template: ''
            }
        }
    })

    .state('app.profile', {
        url: '/profile',
        views: {
            'menuContent': {
                templateUrl: 'templates/profile.html',
                controller: 'ProfileCtrl'
            },
            'fabContent': {
                template: '<button id="fab-profile" class="button button-fab button-fab-bottom-right button-energized-900"><i class="icon ion-plus"></i></button>',
                controller: function ($timeout) {
                }
            }
        }
    })
    ;
    $urlRouterProvider.otherwise('/app/login');
});
จะอธิบายและศึกษาเฉพาะส่วน หากใครเริ่มต้นศึกษา แนะนำให้อ่านบทความเกี่ยวกับ ionicframework
ในตอนต้นๆ ก่อนเพื่อความเข้าใจ
angular.module('starter', ['ionic', 'starter.controllers', 'ionic-material', 'ionMdInput'])
โค้ดส่วนนี้ เป็นการลงทะเบียนและเรียกใช้ angular modules
starter คือ ชื่อ module ที่เรากำหนดในไฟล์ index.html
<body ng-app="starter">
    <ion-nav-view></ion-nav-view>
</body>
สวน starter.controllers คือ ชื่อ module ที่เรียกใช้จากไฟล์ controllers.js
/* global angular, document, window */
'use strict';

angular.module('starter.controllers', [])
..........
ส่วนค่าอื่นๆ ที่เหลือก็เป็นชื่อ module ที่เรามีการใช้งานร่วมกับ app ของเรา
ได้แก่ ionic , ionic-material , ionMdInput
โค้ดส่วนต่อมา
.run(function($ionicPlatform) {
    $ionicPlatform.ready(function() {
        if (window.cordova && window.cordova.plugins.Keyboard) {
            cordova.plugins.Keyboard.hideKeyboardAccessoryBar(true);
        }
        if (window.StatusBar) {
            StatusBar.styleDefault();
        }
    });
})
โค้ดส่วนนี้ให้ข้ามไปก่อน เรายังไม่สนใจ
ส่วนที่เราให้ความสนใจ และต้องการศึกษาในตอนนี้คือส่วนของ
.config(function($stateProvider, $urlRouterProvider, $ionicConfigProvider) {
    $ionicConfigProvider.views.maxCache(0);

    $stateProvider.state('app', {
        url: '/app',
        abstract: true,
        templateUrl: 'templates/menu.html',
        controller: 'AppCtrl'
    })

    .state('app.activity', {
        url: '/activity',
        views: {
            'menuContent': {
                templateUrl: 'templates/activity.html',
                controller: 'ActivityCtrl'
            },
            'fabContent': {

.........
....
..

    $urlRouterProvider.otherwise('/app/login');
});
สำหรับโค้ดในส่วนนี้ เหมือนการวางโครงสร้างว่า app ของเราจะมีหน้าไหนบ้าง
state ก็เหมือนส่วนของตำแหน่งของการแสดง app ของเรา เช่น
state เริ่มต้นชื่อว่า app มื child state เป้น app.activity และอื่นๆ
เรามาดูว่าโค้ดตัวอย่างของเรามี state อะไรบ้าง
- ส่วนแรกสุดเป็น parent state ชื่อ ว่า app
- ส่วนทีสองเป็น child state ได้แก่ activity ,friends, gallery, login, profile
เวลากำหนดเราจะใช้รูปแบบ parent.child ตัวอย่างถ้าเป็น state activity
ก็จะกำหนดได้เป้น app.activity แบบนี้เป็นต้น
ส่วนต่อไปเรามาดู url หรือก็ส่วนที่แสดงบน address bar ของแต่ละ state
    $stateProvider.state('app', {
        url: '/app',
        abstract: true,
        templateUrl: 'templates/menu.html',
        controller: 'AppCtrl'
    })

    .state('app.activity', {
        url: '/activity',
    })

    .state('app.friends', {
        url: '/friends',
    })

    .state('app.gallery', {
        url: '/gallery',
    })

    .state('app.login', {
        url: '/login',
    })

    .state('app.profile', {
        url: '/profile',
    })
    ;
    $urlRouterProvider.otherwise('/app/login');
รูปแบบก็จะเป้น '/ชื่อ state' เช่นถ้าเราเปิดหน้า app ไปที่หน้า profile
url ที่แสดงบน address bar ก็จะเป้น #/app/profile
สังเกตว่า prfile จะเป็น child state ของ app ที่เป็น parent state
url ของ app ที่เป็น parent state คือ '/app'
url ของ profile ที่เป็น child state คือ '/profile'
url ของ address bar ของ app.profile state ก็จะได้เป้น #/app/profile แบบนี้เป็นต้น
(# คือรูปแบบการจัดการ url ของ hybrid app ซึ่งจะต่างกับรูปแบบเว็บทั่วไป ต่อไปจะขอละ # มีพิมพ์แสดง
ให้เข้าใจว่าจะมี # นำหน้าเสมอ)
ต่อมา มาดูในส่วนของ parent state
    $stateProvider.state('app', {
        url: '/app',
        abstract: true,
        templateUrl: 'templates/menu.html',
        controller: 'AppCtrl'
    })
จะมีส่วนของการกำหนด abstract ,templateUrl: และ controller
abstract: true, ก็คือกำหนดให้ parent state นี้มีสถานะเป็น abstract state
Abstract state นี้จะไม่ถูกใช้งานหรือ activated ด้วมันเอง ซึ่งก็คือ เราไม่สามารถเรียกใช้งาน
ผ่าน /app ปกติเพื่อให้ state นี้ทำงานได้ แต่ state นี้จะถูกใช้งานอัตโนมัติเมื่อ child state ถูกเรียกใช้
เช่นเมื่อเรียกใช้งาน /app/profile ซึ่งเป็น child state ดังนี้แล้ว app ชื่อเป็น parent state ก็จะถูก
เรียกใช้งานในทางอ้อมไปด้วย โดยมีการเรียกไฟล์ template มาใช้งานและสร้าง ชื่อ controller
ดังนั้น เมื่อเรามีการเรียกใช้งาน /app/profile
ก็จะไปดึงรูปแบบการแสดงผลจากไฟล์ menu.html ผ่าน templateUrl
templateUrl: 'templates/menu.html',
และก็มีการสร้าง controller ชื่อ AppCtrl ขึ้นผ่าน
controller: 'AppCtrl'
ต่อไปเรามาดูส่วนของ child state จะสังเกตเห็นว่า รูปแบบการใช้งานก็จะคล้ายกัน
เปลี่ยนค่าไปตามส่วนที่กำหนด ขอยกมาสัก state มาอธิบาย
    .state('app.activity', {
        url: '/activity',
        views: {
            'menuContent': {
                templateUrl: 'templates/activity.html',
                controller: 'ActivityCtrl'
            },
            'fabContent': {
                template: '<button id="fab-activity" class="button button-fab button-fab-top-right expanded button-energized-900 flap"><i class="icon ion-paper-airplane"></i></button>',
                controller: function ($timeout) {
                    $timeout(function () {
                        document.getElementById('fab-activity').classList.toggle('on');
                    }, 200);
                }
            }
        }
    })
แยกมาดูส่วนของ views
    .state('app.activity', {
        url: '/activity',
        views: {
            'menuContent': {

            },
            'fabContent': {

            }
        }
    })
views ของแต่ละ state ก็คือ ส่วนของการแสดงข้อมูลซึ่งเราสามารถแยกย่อยไปแต่ละส่วนได้
เรากลับไปดูที่ไฟล์ menu.html ที่เป็น template แรกที่ถูกโหลดมาใช้งาน โดยดูโครงสร้าง app ประกอบ
ตามรูป
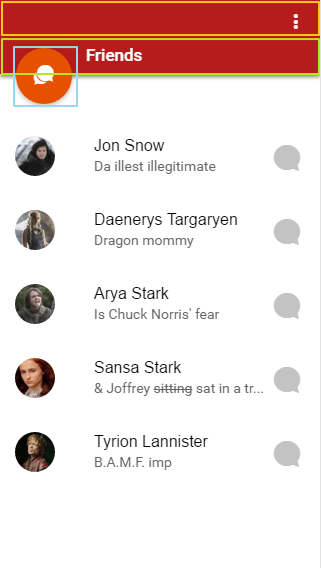
ดูโค้ดไฟล์ menu.html ประกอบ
<ion-side-menus enable-menu-with-back-views="true">
<ion-side-menu-content>
<ion-nav-bar class="bar-assertive-900" ng-class="{expanded: isExpanded, 'has-header-fab-left': hasHeaderFabLeft, 'has-header-fab-right': hasHeaderFabRight}" align-title="left">
<!-- ส่วนหัวของ app หรือส่วนของ bar จากรูปด้านบนก็จะเป้นส่วนขอกรอบงสี่เหลี่ยมสีเหลือง-->
</ion-nav-bar>
<ion-nav-view name="fabContent">
<!-- ส่วนของไอค่อนเมนูย่อย ส่วนของกรอบสีเขียวและฟ้า-->
</ion-nav-view>
<ion-nav-view name="menuContent" ng-class="{expanded: isExpanded}" >
<!-- เนื้อหาของ app จะแสดงในส่วนนี้ ส่วนของกรอบสีม่วง-->
</ion-nav-view>
</ion-side-menu-content>
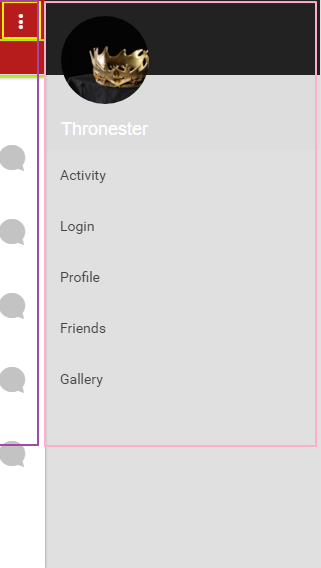
<ion-side-menu side="right"><!-- ส่่วนของ เมนูด้านขวา ส่วนของกรอบสีชมพู -->
<ion-header-bar class="dark-bg expanded">
<!-- ส่วนหัวหรือ bar ของเมนูด้านขวา-->
</ion-header-bar>
<ion-content class="stable-bg has-expanded-header">
<!-- เนื้อหาของเมนูด้านขวา-->
</ion-content>
</ion-side-menu>
</ion-side-menus>
รูปแบบของ app demo จะเป็นแบบเมีเมนูด้านขวา ใช้งาน ion-side-menu
และมีแท็บ subheader พร้อมปุ่มไอคอน ขอแยกให้ดูง่ายขึ้น
<ion-side-menus enable-menu-with-back-views="true">
    <ion-side-menu-content>
<!--			เนื้อหาตรงกลางของ app กรอบสีม่วง -->
    </ion-side-menu-content>
    <ion-side-menu side="right"><!-- ส่่วนของ เมนูด้านขวา กรอบสีชมพู-->
<!--			เนื้อหาของเมนูด้านขวา-->
    </ion-side-menu>
</ion-side-menus>
ขอจบส่วนของตอนนี้ไว้แค่นี้ก่อน ดูต่อในเนื้อหาตอนหน้า
 เนื้อหาที่เกี่ยวข้อง