การประยุกต์และใช้งาน form validation ที่ bootstrap 4 เตรียมมาให้

เขียนเมื่อ 5 ปีก่อน โดย Ninenik Narkdee
form validation bootstrap 4

คำสั่ง การ กำหนด รูปแบบ ตัวอย่าง เทคนิค ลูกเล่น การประยุกต์ การใช้งาน เกี่ยวกับ form validation bootstrap 4

ดูแล้ว 43,959 ครั้ง


จากเนื้อหาตอนที่แล้ว เราได้รู้จักแนวทางการตรวจสอบฟอร์ม ที่เราสร้างฟังก์ชั่นขึ้นมาใช้งานแล้ว ในเนื้อหาต่อไปนี้
จะขอเพิ่มเติมการใช้งาน รูปแบบการตรวจสอบ ที่มีมาให้ใน bootstrap ดูตัวอย่างได้ที่ DEMO 1 ท้ายบทความ
    เนื้อหาตอนที่แล้ว
    เทคนิคแนวทางตรวจสอบฟอร์ม form validation ใน bootstrap 4 อย่างง่าย http://niik.in/873 
 
สิ่งแรกที่ต้องทำคือ เพิ่ม property "novalidate" ให้กับ form โดย "novalidate" จะเป็นการยกเลิกการ
ตรวจสอบฟอร์มจาก browser มาเป็นตรวจสอบฟอร์มแบบกำหนดเอง และอีกส่วนคือ 
กำหนด id เช่น "myform1" ไว้อ้างอิงเพื่อเรียกใช้งาน 
 
<form id="myform1" name="form1" method="post" action="" novalidate>

</form>
 
และนี้คือรูปแบบ javascipt ที่เราใช้ผ่าน jquery เป็นดังนี้
 
<script type="text/javascript">
$(function(){
     $("#myform1").on("submit",function(){
		 var form = $(this)[0];
        if (form.checkValidity() === false) {
          event.preventDefault();
          event.stopPropagation();
        }
        form.classList.add('was-validated');		 
	 });	 
});
</script>
 
ต่อไป element ใดๆ ที่เราต้องการตรวจสอบ ให้เพิ่ม property "required" เข้าไป เช่น
 
<input type="text" class="form-control" name="input_name" id="input_name" 
autocomplete="off" value=""  required>
 
และส่วนสุดท้ายของฟอร์ม ก็คือเพิ่ม ข้อความแจ้งเตือน กรณีที่ element นั้นๆ ไม่ผ่านเงื่อนไขการตรวจสอบ โดยจะ
ต้องเพิ่มต่อเข้าไป หลังจาก element ที่เรากำหนด "required" property ก็จะได้เป็น
 
<input type="text" class="form-control" name="input_name" id="input_name" 
autocomplete="off" value=""  required>
<div class="invalid-feedback">
กรุณากรอกชื่อ นามสกุล
</div>    
 
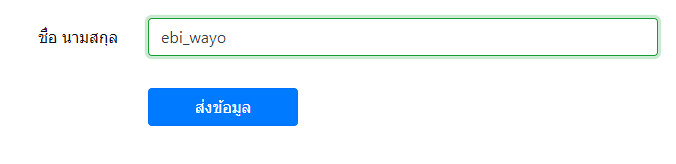
โดย Bootstrap จะใช้ class "invalid-feedback" เพื่อแสดงการแจ้งเตือนเมื่อไม่ผ่านการตรวจสอบ มาดูหน้าตาตัวอย่าง
ผลลัพธ์เบื้องต้นกัน


เมื่อเรากดปุ่ม ส่งข้อมูล โดยที่ยังไม่ได้กรอกข้อมูลที่จำเป็น ก็จะขึ้นแจ้ง พร้อมแสดงข้อความแจ้งเตือน ที่ถูกซ่อนเอาไว้
และเมือเรากรอกข้อมูล ก็จะทำให้ผ่านเงื่อนไขการตรวจสอบ ส่วนของ element นั้นๆ มีสถานะเป็น valid หรือผ่านการ
ตรวจสอบ อย่างเห็นได้ชัด ตามตัวอย่างรูปด้านล่าง


สมมติเราต้องการตรวจสอบเพิ่มเติม นอกจากค่าว่างหรือไม่ว่าง เราสามารถใช้ pattern สำหรับกรณีเป็น input type 
( text, date, search, url, tel, email และ password )
มาประกรอบได้ ซึ่งถ้ามีความเข้าใจในการใช้งาน regular expression จะสามารถประยุกต์ส่วนนี้ได้เป็นอย่างดี ยกตัวอย่าง
เราต้องการให้ตรวจสอบว่ากรอกข้อมูลในรูปแบบมือถือ 10 หลักถูกต้องหรือไม่ด้วย ก็จะเป็นดังนี้
 
<input type="text" class="form-control" pattern="^0([8|9|6])([0-9]{8}$)" name="input_tel" id="input_tel" 
autocomplete="off" value=""  required>
<div class="invalid-feedback">
กรุณากรอกเบอร์มือถือตัวเลข 10 หลัก
</div>     
 
สมมติเรากรอกรูปแบบเบอร์มือถือไม่ถูกต้อง


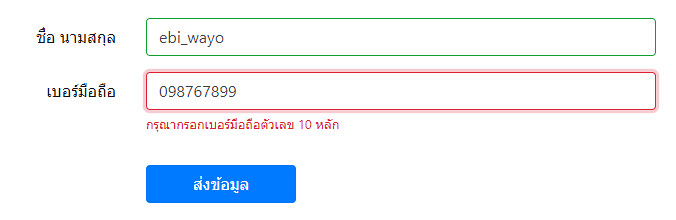
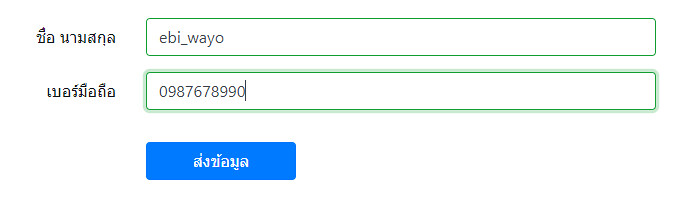
จะเห็นว่า จะไม่ใช่เพียงการตรวจสอบ ว่าเป็นค่าว่างหรือไม่เท่านั้น แต่ยังตรวจสอบรูปแบบของข้อมูลว่าตรงตามรูปแบบที่
กำหนดใน pattern หรือไม่ เมื่อเรากรอกรูปแบบถูกต้อง ก็จะเป็นดังรูปด้านล่าง


ถ้ากรณีต้องการตรวจสอบอีเมล เราสามารถกำหนดด้วย pattern กับ input type="text" หรือ input type="email" 
ตัวอย่างการใช้งานการตรวจสอบอีเมล
 
<div class="form-group row">
    <label for="input_email" class="col-sm-3 col-form-label text-right">อีเมล</label>
    <div class="col">
      <input type="text" class="form-control" name="input_email" id="input_email" 
      pattern="^[a-z0-9._%+-]+@[a-z0-9.-]+\.[a-z]{2,4}$"
      autocomplete="off" value="" required>
      <div class="invalid-feedback">
        กรุณากรอกอีเมล
      </div>            
    </div>
</div>
 
ต่อไปกรณีสมมติเป็นตัวเลข OTP หรือเป็นตัวเลขอย่างเดียว อาจจะเป็น 5 หลักก็ได้ เราสามารถกำหนดเป็นดังนี้
 
<div class="form-group row">
    <label for="input_otp" class="col-sm-3 col-form-label text-right">รหัส OTP</label>
    <div class="col">
      <input type="text" class="form-control" name="input_otp" id="input_otp" 
      pattern="[0-9]{5}"
      autocomplete="off" value="" required>
      <div class="invalid-feedback">
        กรุณากรอกรหัส OTP เป็นตัวเลข 5 หลัก
      </div>            
    </div>
</div>
 
อย่างไรก็ตาม กรณีที่จำเป็นที่ต้องกรอกข้อมุลเป็นตัวเลข ถ้าเป็นโหมดมือถือ การใช้งาน input type="number" จะทำ
ให้ผู้ใช้สะดวกในการกรอกข้อมูล เพราะแป้นมือถือจะเป็นตัวเลข ทำให้กรอกข้อมูลง่าย แต่ด้วยว่า pattern ไม่สามารถ
ใช้งานกับ type="number" ได้ หากจะใช้งาน เราจำเป็นต้อง เพิ่มเติม javascript เข้าไป มาดูตัวอย่าง
สมมติกรณีแรก กรอกตัวเลข ค่าตั้ง x-y โดย x คือค่าน้อยสุด และ y คือค่ามากสุด เราสามารถกำหนดเป็นดังนี้
 
<input type="number" class="form-control" name="input_otp" id="input_otp" 
min="1" max="10" 
autocomplete="off" value="" required>
 
จะผ่านเงื่อนไขนี้ ต้องกรอกตัวเลขค่าตั้งแต่ 1 แต่ไม่เกิน 10 ค่าใดก็ได้
 
ต่อมาแบบที่กรอกเป็นตัวเลข แต่มีการกำหนดจำนวนตัวอักษร เช่น กรณีเป็นรหัส OTP เป็นตัวเลข 5 หลัก ซึ่งหมายความ
ว่า เราสามารถกรอกเป็นตัวเลข 00000 - 99999 ในกรณีนี้ เราจำเป็นต้องใช้ javascript เข้ามาช่วยเพิ่มเติม คือ ห้ามกรอก
เกิน 5 ตัว และ ค่าต้องเป็นไปตามเงื่อนไข เราจะได้เป็นดังนี้
 
<input type="number" class="form-control" name="input_otp" id="input_otp" 
maxlength="5"
min="1" max="99999" oninput="this.value.length<this.maxLength?this.min=Math.pow(10, this.value.length):this.min=0" 
onkeypress="return (this.value.length>=this.maxLength)?false:true"
autocomplete="off" value="" required>
 
หากต้องการเปลี่ยนเป็น 6 ตัว ให้เราเปลี่ยนตรง maxlength="5" เป็น maxlength="6" และเปลี่ยนตรง
max="99999" ให้เป็น max="999999" หรือก็คือ มีเลข 9 เท่ากับ 6 ตัว 
 
 
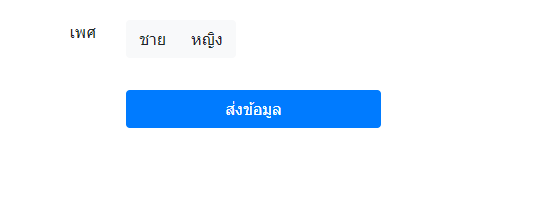
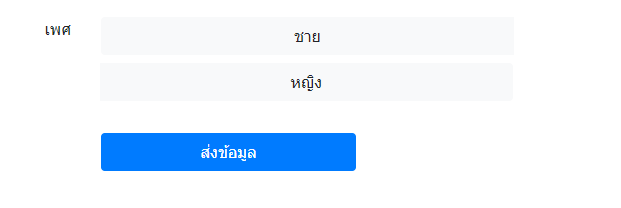
ต่อไปมาดูในส่วนของกรณีที่เป็น radio หรือ checkbox กันบ้าง โดยจะใช้งานคล้ายกัน จะยกตัวอย่างเฉพาะ radio 
กรณีที่ต้องเลือกค่าใดค่าหนึ่งของ radio ก็จะกำหนดคล้าย input
คือเพิ่ม property "required" เข้าไป พร้อมกับกำหนด <div class="invalid-feedback">ข้อความแจ้ง</div>
เข้าไปต่อจาก label ของ radio ตัวสุดท้าย ยกตัวอย่าง
 
<div class="form-group row">
	<legend class="col-form-label col-sm-3 pt-0 text-right">เพศ</legend>
    <div class="col">
        <div class="form-check">
          <input class="form-check-input" type="radio" 
          name="radio_gender" id="radio_gender_1" value="male" required>
          <label class="form-check-label" for="radio_gender_1">
            ชาย
          </label>
        </div>
        <div class="form-check">
          <input class="form-check-input" type="radio" 
          name="radio_gender" id="radio_gender_2" value="female" required>
          <label class="form-check-label" for="radio_gender_2">
            หญิง
          </label>
          <div class="invalid-feedback">
            กรุณาเลือกเพศ
          </div>               
        </div>         
    </div>
</div>
 
กรณีไม่ผ่านเงื่อนไข


กรณีผ่านเงื่อนไข


จำไว้เสมอว่า การกำหนด ตำแหน่งของ <div class="invalid-feedback"></div> ถ้าเราวางไว้ไม่ติดกับ element หรือ
ไม่ติดกับ label ตัวแจ้งอาจจะไม่แสดง
 
ส่วนของ textarea และ select ก็จะกำหนดคล้าย input ตัวอย่างดูได้ที่โค้ดเต็ม
 
<!doctype html>
<html>
<head>
    <meta charset="utf-8">
    <meta name="viewport" content="width=device-width, initial-scale=1, shrink-to-fit=no"> 
    <title>Document</title> 
    <link rel="stylesheet" href="https://unpkg.com/bootstrap@4.1.0/dist/css/bootstrap.min.css" >
</head>
<body>
 
 <div class="container">
 <br>
<form id="myform1" name="form1" method="post" action="" novalidate>
<div class="form-group row">
    <label for="input_name" class="col-sm-3 col-form-label text-right">ชื่อ นามสกุล</label>
    <div class="col">
      <input type="text" class="form-control" name="input_name" id="input_name" 
      autocomplete="off" value=""  required>
      <div class="invalid-feedback">
        กรุณากรอกชื่อ นามสกุล
      </div>      
    </div>
</div>
<div class="form-group row">
    <label for="input_tel" class="col-sm-3 col-form-label text-right">เบอร์มือถือ</label>
    <div class="col">
      <input type="text" class="form-control" pattern="^0([8|9|6])([0-9]{8}$)" name="input_tel" id="input_tel" 
      autocomplete="off" value=""  required>
      <div class="invalid-feedback">
        กรุณากรอกเบอร์มือถือตัวเลข 10 หลัก
      </div>      
    </div>
</div>
<div class="form-group row">
    <label for="input_email" class="col-sm-3 col-form-label text-right">อีเมล</label>
    <div class="col">
      <input type="text" class="form-control" name="input_email" id="input_email" 
      pattern="^[a-z0-9._%+-]+@[a-z0-9.-]+\.[a-z]{2,4}$"
      autocomplete="off" value="" required>
      <div class="invalid-feedback">
        กรุณากรอกอีเมล
      </div>            
    </div>
</div>
<div class="form-group row">
    <label for="input_otp" class="col-sm-3 col-form-label text-right">รหัส OTP</label>
    <div class="col">
      <input type="number" class="form-control" name="input_otp" id="input_otp" 
      maxlength="5"
      min="1" max="99999" oninput="this.value.length<this.maxLength?this.min=Math.pow(10, this.value.length):this.min=0" 
      onkeypress="return (this.value.length>=this.maxLength)?false:true"
      autocomplete="off" value="" required>
      <div class="invalid-feedback">
        กรุณากรอกรหัส OTP เป็นตัวเลข 5 หลัก
      </div>            
    </div>
</div>
<div class="form-group row">
	<legend class="col-form-label col-sm-3 pt-0 text-right">เพศ</legend>
    <div class="col">
        <div class="form-check">
          <input class="form-check-input" type="radio" 
          name="radio_gender" id="radio_gender_1" value="male" required>
          <label class="form-check-label" for="radio_gender_1">
            ชาย
          </label>
        </div>
        <div class="form-check">
          <input class="form-check-input" type="radio" 
          name="radio_gender" id="radio_gender_2" value="female" required>
          <label class="form-check-label" for="radio_gender_2">
            หญิง
          </label>
          <div class="invalid-feedback">
            กรุณาเลือกเพศ
          </div>               
        </div>         
    </div>
</div>
 <div class="form-group row">
    <label for="textarea_address" class="col-sm-3 col-form-label text-right">ที่อยู่</label>
    <div class="col">
    	<textarea class="form-control" name="textarea_address" id="textarea_address" rows="3" required></textarea>
       <div class="invalid-feedback">
        กรุณากรอกที่อยู่
      </div>       
    </div>   
</div>       
 <div class="form-group row">
    <label for="select_province" class="col-sm-3 col-form-label text-right">จังหวัด</label>
    <div class="col">
       <select class="custom-select"  name="select_province" id="select_province" required>
        <option value="">เลือกจังหวัด</option>
        <option value="กรุงเทพ">กรุงเทพ</option>
      </select>    
      <div class="invalid-feedback">
        กรุณาเลือกจังหวัด
      </div>           
    </div>    
</div>       
<div class="form-group row">
    <label for="input_zipcode" class="col-sm-3 col-form-label text-right">รหัสไปรษณีย์</label>
    <div class="col">
      <input type="number" class="form-control" name="input_zipcode" id="input_zipcode" 
      autocomplete="off" value="" min="10000" max="99999" required>
      <div class="invalid-feedback">
        กรุณากรอกรหัสไปรณีย์
      </div>      
    </div>
</div>       
<div class="form-group row">
    <div class="col-sm-3 offset-sm-3 text-right pt-3">
		 <button type="submit" name="btn_submit" id="btn_submit" value="1" class="btn btn-primary btn-block">ส่งข้อมูล</button>
	</div>
</div> 
</form> 
 
 </div>
 
<script src="https://unpkg.com/jquery@3.3.1/dist/jquery.min.js"></script>
<script src="https://unpkg.com/bootstrap@4.1.0/dist/js/bootstrap.min.js"></script>
<script type="text/javascript">
$(function(){
     $("#myform1").on("submit",function(){
		 var form = $(this)[0];
        if (form.checkValidity() === false) {
          event.preventDefault();
          event.stopPropagation();
        }
        form.classList.add('was-validated');		 
	 });	 
});
</script>
</body>
</html>
 

ดูผลลัพธ์ได้ที่ DEMO 1

 
ก่อนจบ ขอเพิ่มบางกรณีเกี่ยวกับ checkbox ซึ่งโดยทั่วไปแล้ว เราจะกำหนดคล้าย radio แต่ลักษณะของ radio นั้น
คือเลือกอย่างใด อย่างหนึ่ง ก็จะเข้าเงื่อนไข แต่ของ checkbox ที่มีให้เลือกหลายรายการ และต้องเลือกอย่างน้อย 
1 รายการ เมื่อเราใส่ property "required"  เข้า จะกลายเป็นว่า เราต้องเลือกทุกรายการ ถึงจะผ่านเงื่อนไข ตามตัวอย่าง
ต่อไปนี้
 
<div class="form-group row">
	<legend class="col-form-label col-sm-3 pt-0 text-right">ความสนใจ</legend>
    <div class="col">
      <div class="form-check">
        <input class="form-check-input" type="checkbox" 
        name="checkbox_hobby1" id="hobby1" value="การออกกำลังกาย" required>
        <label class="form-check-label" for="hobby1">
          การออกกำลังกาย
        </label>
      </div>    
      <div class="form-check">
        <input class="form-check-input" type="checkbox" 
        name="checkbox_hobby2" id="hobby2" value="อ่านหนังสือ" required>
        <label class="form-check-label" for="hobby2">
          อ่านหนังสือ
        </label>
          <div class="invalid-feedback">
            กรุณาเลือกความสนใจ
          </div>        
      </div>    
    </div>
</div>
 
กรณีลักษณะนี้ เราจำเป็นต้องเพิ่มหรือประยุกต์เพิ่มเต็ม เพื่อให้การตรวจสอบฟอร์มของ bootstrap ทำงานได้
โดยเราต้องการให้ เมื่อเลือกอย่างน้อย 1 รายการ ก็ให้ผ่านเงื่อนไข เทคนิคที่เราจะใช้คือ เพิ่ม class "required"
 
<input class="form-check-input required" type="checkbox" 
name="checkbox_hobby1" id="hobby1" value="การออกกำลังกาย" required>
 
เข้าไป ในกลุ่มของ checkbox นั้น จากนั้น ใช้ jquery ตรวจสอบว่า ถ้ามีการเลือกแล้วอย่างน้อย 1 รายการ
ให้ทำการเอา property "required" ออก เราก็จะได้ในส่วนของ javascript เป็นดังนี้
 
<script type="text/javascript">
$(function(){
	var checkbox_required = false;
	$(":checkbox.required").on("click",function(){
		var is_checked = $(this).prop("checked");
		if(is_checked){
			$(":checkbox.required").prop('required',false);
			checkbox_required = true;
		}else{
			if($(":checkbox.required:checked").length==0){
				checkbox_required = false;
				$(":checkbox.required").prop('required',true);
			}
		}
		
	});
     $("#myform1").on("submit",function(){
		 var form = $(this)[0];
        if (form.checkValidity() === false || checkbox_required===false) {
          event.preventDefault();
          event.stopPropagation();
        }
        form.classList.add('was-validated');		 
	 }); 
});
</script> 
 

ตัวอย่างโค้ดแบบเต็ม

 
<!doctype html>
<html>
<head>
    <meta charset="utf-8">
    <meta name="viewport" content="width=device-width, initial-scale=1, shrink-to-fit=no"> 
    <title>Document</title> 
    <link rel="stylesheet" href="https://unpkg.com/bootstrap@4.1.0/dist/css/bootstrap.min.css" >
</head>
<body>
 
 <div class="container">
 <br>
<form id="myform1" name="form1" method="post" action="" novalidate>
<div class="form-group row">
    <label for="input_name" class="col-sm-3 col-form-label text-right">ชื่อ นามสกุล</label>
    <div class="col">
      <input type="text" class="form-control" name="input_name" id="input_name" 
      autocomplete="off" value=""  required>
      <div class="invalid-feedback">
        กรุณากรอกชื่อ นามสกุล
      </div>      
    </div>
</div>
<div class="form-group row">
	<legend class="col-form-label col-sm-3 pt-0 text-right">ความสนใจ</legend>
    <div class="col">
      <div class="form-check">
        <input class="form-check-input required" type="checkbox" 
        name="checkbox_hobby1" id="hobby1" value="การออกกำลังกาย" required>
        <label class="form-check-label" for="hobby1">
          การออกกำลังกาย
        </label>
      </div>    
      <div class="form-check">
        <input class="form-check-input required" type="checkbox" 
        name="checkbox_hobby2" id="hobby2" value="อ่านหนังสือ" required>
        <label class="form-check-label" for="hobby2">
          อ่านหนังสือ
        </label>
          <div class="invalid-feedback">
            กรุณาเลือกความสนใจ
          </div>        
      </div>    
    </div>
</div>
<div class="form-group row">
    <div class="col-sm-3 offset-sm-3 text-right pt-3">
		 <button type="submit" name="btn_submit" id="btn_submit" value="1" class="btn btn-primary btn-block">ส่งข้อมูล</button>
	</div>
</div> 
</form> 
 
 </div>
 
<script src="https://unpkg.com/jquery@3.3.1/dist/jquery.min.js"></script>
<script src="https://unpkg.com/bootstrap@4.1.0/dist/js/bootstrap.min.js"></script>
<script type="text/javascript">
$(function(){
	var checkbox_required = false;
	$(":checkbox.required").on("click",function(){
		var is_checked = $(this).prop("checked");
		if(is_checked){
			$(":checkbox.required").prop('required',false);
			checkbox_required = true;
		}else{
			if($(":checkbox.required:checked").length==0){
				checkbox_required = false;
				$(":checkbox.required").prop('required',true);
			}
		}
		
	});
     $("#myform1").on("submit",function(){
		 var form = $(this)[0];
        if (form.checkValidity() === false || checkbox_required===false) {
          event.preventDefault();
          event.stopPropagation();
        }
        form.classList.add('was-validated');		 
	 });
});
</script>
</body>
</html>
 

ดูผลลัพธ์ได้ที่ DEMO 2


   เพิ่มเติมเนื้อหา ครั้งที่ 1 วันที่ 14-05-2018


เพิ่มฟังก์ชั่นตรวจสอบข้อมูลพิเศษ เพิ่มเติม

 
เนื้อหาเพิ่มเติมนี้ จะเป็นแนวทางการปัญหา การใช้งาน pattern กรณี element ที่ใช้งานไม่รองรับการ
กำหนด pattern attribute อย่างในเนื้อหาและตัวอย่างที่ผ่านมา เราจะเห็นว่า กรณีที่เราเปลี่ยนจาก 
input type="text" เป็น type="number" เพื่อให้ผู้ใช้สามารถใช้งานแป้นพิมพ์ที่เป็นตัวเลขอย่างเดียว
ในกรณีที่ใช้งานผ่านมือถือ และฟิลด์ที่ต้องกรอกกำหนดว่าต้องเป็นตัวเลข 
 
เทคนิคเดิม เราจะใช้วิธีการกำหนดดังนี้
 
<input type="number" class="form-control" name="input_otp" id="input_otp" 
maxlength="5"
min="1" max="99999" oninput="this.value.length<this.maxLength?this.min=Math.pow(10, this.value.length):this.min=0" 
onkeypress="return (this.value.length>=this.maxLength)?false:true"
value="" required>
 
ถึงแม้วิธีการข้างต้น จะสามารถแก้ปํญหาได้ แต่ก็ยังถือว่าเป็นวิธีที่ยังไม่ครอบคลุมพอ ดังนั้น แนวทางเพิ่ม
เติม เพื่อให้สามารถเรียกใช้ฟังก์ชั่นการตรวจสอบข้อมูลเพิ่มเติม และให้ทำงานร่วมกับ bootstrap ได้ เราจึง
ใช้วิธี เรียกใช้ฟังก์ชั่น ผ่าน "oninput" event คือเมื่อมีการแก้ไขข้อมูล เราจะส่งค่าข้อมูลนั้นไปทำการตรวจสอบ
ในฟังก์ชั่น จะเห็นว่าเมื่อเรามีการนำข้อมูลไปตรวจสอบในฟังก์ชั่นได้ ก็เท่ากับว่าเราจะตรวจสอบข้อมูลในเงื่อน
ไขใดๆ ก็ได้ ไม่เพียงแต่การตรวจสอบรูปแบบข้อมูล สมมติ จากตัวอย่างเดิม เราตรวจสอบการกรอกตัวเลข
ที่เป็นรหัส OTP 5 หลัก เราใช้วิธีข้างต้น แต่วิธีไหม่ เราจะกำหนดเป็นดังนี้
 
 
<input type="number" class="form-control" oninput="validOtp(this)" name="input_otp" id="input_otp" 
 value="" required>
 
และก็ฟังก์ชั่นที่กำหนดเพิ่มเติม
 
function validOtp(obj){
	var pattern_otp = /(^[0-9]{5}$)/;
	obj.setCustomValidity(obj.value.match(pattern_otp)?"":"invalid");
}
 
โดยวิธีการนี้ เราใช้วิธีการกำหนดค่าให้กับ element ที่ไม่ผ่านการตรวจสอบด้วยคำสั่ง setCustomValidity()
ซึ่งถ้าเงื่อนไขการตรวจสอบเป็นจริง (true) ก็กำหนดให้เป็นค่าว่าง หรือก็คือผ่านการตรวจสอบ 
แต่ถ้าเงื่อนไขเป็นเท็จ (false) ก็กำหนดให้เป็นข้อความแจ้งที่ต้องการ ซึ่งกรณีของเรามีการกำหนด novalidate
property ให้กับ form ข้อความที่เรากำหนดจึงไม่ขึ้นแจ้ง แต่จะขึ้นแจ้งเป็นข้อความที่เรากำหนดในส่วนของ
div class "invalid-feedback" แทน
 
<div class="invalid-feedback">
ข้อความแจ้ง
</div>
 
โค้ดตัวอย่างแบบเต็ม
 
<!doctype html>
<html>
<head>
    <meta charset="utf-8">
    <meta name="viewport" content="width=device-width, initial-scale=1, shrink-to-fit=no"> 
    <title>Document</title> 
    <link rel="stylesheet" href="https://unpkg.com/bootstrap@4.1.0/dist/css/bootstrap.min.css" >
</head>
<body>
 
 <div class="container">
 <br>
<form id="myform1" name="form1" method="post" action="" novalidate>
<div class="form-group row">
    <label for="input_otp" class="col-sm-3 col-form-label text-right">รหัส OTP</label>
    <div class="col">
        <input type="number" class="form-control" oninput="validOtp(this)" name="input_otp" id="input_otp" 
         value="" required>
      <div class="invalid-feedback">
        กรุณากรอกรหัส OTP เป็นตัวเลข 5 หลัก
      </div>            
    </div>
</div>
<div class="form-group row">
    <div class="col-sm-3 offset-sm-3 text-right pt-3">
		 <button type="submit" name="btn_submit" id="btn_submit" value="1" class="btn btn-primary btn-block">ส่งข้อมูล</button>
	</div>
</div> 
</form> 
 
 </div>
 
<script src="https://unpkg.com/jquery@3.3.1/dist/jquery.min.js"></script>
<script src="https://unpkg.com/bootstrap@4.1.0/dist/js/bootstrap.min.js"></script>
<script type="text/javascript">
function validOtp(obj){
	var pattern_otp = /(^[0-9]{5}$)/;
	obj.setCustomValidity(obj.value.match(pattern_otp)?"":"invalid");
}
$(function(){
     $("#myform1").on("submit",function(){
		 var form = $(this)[0];
        if (form.checkValidity() === false) {
          event.preventDefault();
          event.stopPropagation();
        }
        form.classList.add('was-validated');		 
	 });
});
</script>
</body>
</html>
 
ดูตัวอย่างได้ที่ DEMO 3 
ส่วน DEMO 4 เราจะตัดส่วนของ novalidate ของ form ออก เพื่อให้ browser ตรวจสอบและแจ้งค่าข้อความ
เตือนการตรวจสอบข้อมูลออกมา
 
<form id="myform1" name="form1" method="post" action="" novalidate>


   เพิ่มเติมเนื้อหา ครั้งที่ 2 วันที่ 18-05-2018


เพิ่มเติม การใช้งาน checkbox และ radio buttons 

 
จากเดิม ในฟอร์มเรามีการใช้งาน input radio และ input checkbox ในกรณีที่ต้องการให้มีการเลือกรายการ 
แต่บางครั้ง การใช้งาน element ทั้งสองกรณีบนมือถือ ก็อาจจะไม่ได้รับความสะดวกนัก ดังนั้น เราจึงจะใช้วิธี
เรียกใช้งาน radio และ checkbox ในรูปแบบของ button หรือปุ่มกดแทน ดังต่อไปนี้
 
สมมติรูปแบบเดิมเราเป็นดังนี้
 
<div class="form-group row">
	<legend class="col-form-label col-sm-3 pt-0 text-right">เพศ</legend>
    <div class="col">
        <div class="form-check">
          <input class="form-check-input" type="radio" 
          name="radio_gender" id="radio_gender_1" value="male" required>
          <label class="form-check-label" for="radio_gender_1">
            ชาย
          </label>
        </div>
        <div class="form-check">
          <input class="form-check-input" type="radio" 
          name="radio_gender" id="radio_gender_2" value="female" required>
          <label class="form-check-label" for="radio_gender_2">
            หญิง
          </label>
          <div class="invalid-feedback">
            กรุณาเลือกเพศ
          </div>               
        </div>         
    </div>
</div>


เปลี่ยนมาเป็น
 
<div class="form-group row">
	<legend class="col-form-label col-sm-3 pt-0 text-right">เพศ</legend>
    <div class="col">   
        <div class="btn-group btn-group-toggle" data-toggle="buttons">
          <label class="btn btn-light">
            <input type="radio" name="radio_gender" id="radio_gender_1" autocomplete="off"
            value="male" required> ชาย
          </label>
          <label class="btn btn-light">
            <input type="radio" name="radio_gender" id="radio_gender_2" autocomplete="off"
            value="female" required> หญิง
          </label>
        </div>                        
    </div>
</div>


หรือแสดงแนวตั้งลักษณะด้วยรูปแบบดังนี้
 
สามารถกำหนดโดยเปลี่ยนจาก btn-group เป็น btn-group-vertical แทน

<div class="form-group row">
	<legend class="col-form-label col-sm-3 pt-0 text-right">เพศ</legend>
    <div class="col">   
        <div class="btn-group-vertical btn-group-toggle w-50" data-toggle="buttons">
          <label class="btn btn-light">
            <input type="radio" name="radio_gender" id="radio_gender_1" autocomplete="off"
            value="male" required> ชาย
          </label>
          <label class="btn btn-light">
            <input type="radio" name="radio_gender" id="radio_gender_2" autocomplete="off"
            value="female" required> หญิง
          </label>
        </div>                                    
    </div>
</div>


หรือกำหนดโดยใช้ d-block กำหนดตามโค้ด้านล่างก็ได้

<div class="form-group row">
	<legend class="col-form-label col-sm-3 pt-0 text-right">เพศ</legend>
    <div class="col">   
        <div class="btn-group btn-group-toggle d-block w-50" data-toggle="buttons">
          <label class="btn btn-block btn-light">
            <input type="radio" name="radio_gender" id="radio_gender_1" autocomplete="off"
            value="male" required> ชาย
          </label>
          <label class="btn btn-block btn-light">
            <input type="radio" name="radio_gender" id="radio_gender_2" autocomplete="off"
            value="female" required> หญิง
          </label>
        </div>                        
    </div>
</div>


อย่างไรก็ตามรูปแบบ การใช้งาน radio หรือ checkbox ในรูปแบบ button นั้น เราจะไม่สามารถใช้งานการแจ้ง
การตรวจสอบฟอร์ม แบบปกติได้ แนวทางการแก้ปัญหา คือ เราจะทำการสร้าง input text ขึ้นมาแทรกไว้ 
โดยจะใช้วิธีช่อนไว้ ไม่แสดง แล้วให้ element นี้เป็นตัวตรวจสอบและแจ้งเตือนแทน ดังนี้
 
<div class="form-group row">
	<legend class="col-form-label col-sm-3 pt-0 text-right">เพศ</legend>
    <div class="col">   
        <div class="btn-group btn-group-toggle d-block w-50" data-toggle="buttons">
          <label class="btn btn-block btn-light">
            <input type="radio" name="radio_gender" id="radio_gender_1" autocomplete="off"
            value="male" required> ชาย
          </label>
          <label class="btn btn-block btn-light">
            <input type="radio" name="radio_gender" id="radio_gender_2" autocomplete="off"
            value="female" required> หญิง
          </label>
        </div>       
        <input type="text" id="_radio_gender" class="form-control d-none" value="" required>
        <div class="invalid-feedback">
        กรุณาเลือกเพศ
        </div>                                   
    </div>
</div>
 
โดยสิ่งที่เราจะกำหนดให้กับ input text นี้คือ id เพื่อใช้อ้างอิง ในที่นี้เราจะใช้ชื่อ ของ radio แต่นำหน้าด้วย 
_ (underscore) ในตัวอย่างข้างต้นก็จะเป็น "_radio_gender" ต่อด้วยกำหนด required เพื่อตรวจสอบว่า
ถ้าค่าเป็นว่าง ข้อความแจ้งเตือน ซึ่งจริงๆ แล้วจะต้องเป็นแจ้งเตือนของ radio นอกจากนั้นเรามีการใช้ class 
"d-none" เพื่อซ่อน input text นี้เพื่อไม่ให้แสดง โดยจุดประสงค์หลักก็คือเป็นตัวหลอกการตรวจสอบ
    ขั้นต่อไป เราต้องหาวิธีที่จะให้ค่าของ input text นี้ไม่ว่าง เพื่อให้ผ่านการตรวจสอบ โดยเงื่อนไขต้องสัมพันธ์
กับ การเลือก radio ด้วย ดังนั้น วิธีการก็คือ เราจะตรวจสอบว่า ถ้ามีการเลือก radio ด้านบน ก็ให้ทำการเพิ่มค่า
ให้กับ input text รูปแบบฟังก์ชั่นที่จะใช้งาน จะเป็นดังนี้
 
function validRadio(obj,target_obj){
	var obj_value = $(obj).find(":radio:checked").length;	
	$("#"+target_obj).val(obj_value);	
}
/// กรณีของ checkbox
/*
function validCheckbox(obj,target_obj){
	var obj_value = $(obj).find(":checkbox:checked").length;	
	$("#"+target_obj).val(obj_value);	
}
*/
 
จะเห็นว่า parameter ที่ชื่อ target_obj คือส่วนที่เราจะกำหนด id ของ input text ที่ได้อธิบายไปแล้วข้างต้น
 
มาดูโค้ดตัวอย่างแบบเต็ม จะเป็นดังนี้
 
<!doctype html>
<html>
<head>
    <meta charset="utf-8">
    <meta name="viewport" content="width=device-width, initial-scale=1, shrink-to-fit=no"> 
    <title>Document</title> 
    <link rel="stylesheet" href="https://unpkg.com/bootstrap@4.1.0/dist/css/bootstrap.min.css" >
</head>
<body>
 
 <div class="container">
 <br>
<form id="myform1" name="form1" method="post" action="" class="needs-validation2" novalidate>
<div class="form-group row">
	<legend class="col-form-label col-sm-3 pt-0 text-right">เพศ</legend>
    <div class="col">   
        <div class="btn-group btn-group-toggle d-block w-50" onClick="validRadio(this,'_radio_gender')" data-toggle="buttons">
          <label class="btn btn-block btn-light">
            <input type="radio" name="radio_gender" id="radio_gender_1" autocomplete="off"
            value="male" required> ชาย
          </label>
          <label class="btn btn-block btn-light">
            <input type="radio" name="radio_gender" id="radio_gender_2" autocomplete="off"
            value="female" required> หญิง
          </label>
        </div>       
        <input type="text" id="_radio_gender" class="form-control d-none" value="" required>
        <div class="invalid-feedback">
        กรุณาเลือกเพศ
        </div>                                   
    </div>
</div>
<div class="form-group row">
    <div class="col-sm-3 offset-sm-3 text-right pt-3">
		 <button type="submit" name="btn_submit" id="btn_submit" value="1" class="btn btn-primary btn-block">ส่งข้อมูล</button>
	</div>
</div> 
</form> 
 
 </div>
 
<script src="https://unpkg.com/jquery@3.3.1/dist/jquery.min.js"></script>
<script src="https://unpkg.com/bootstrap@4.1.0/dist/js/bootstrap.min.js"></script>
<script type="text/javascript">
function validRadio(obj,target_obj){
	var obj_value = $(obj).find(":radio:checked").length;	
	$("#"+target_obj).val(obj_value);	
}
$(function(){
     $("#myform1").on("submit",function(){
		 var form = $(this)[0];
        if (form.checkValidity() === false) {
          event.preventDefault();
          event.stopPropagation();
        }
        form.classList.add('was-validated');		 
	 });
});
</script>
</body>
</html>
 
ดูตัวอย่างได้ที่ DEMO 5


   เพิ่มเติมเนื้อหา ครั้งที่ 3 วันที่ 13-09-2019


การใช้งานร่วมกับ input file สำหรับการอัพโหลดไฟล์
 
สำหรับเนื้อหาเพิ่มเติมนี้ เราจะมาดูว่า สมมติเราต้องการ หรือบังคับว่าผู้ใช้ต้องทำการอัพโหลดไฟล์ หรือต้อง
เลือกไฟล์ก่อนทำการส่งข้อมูล เราจะกำหนด ส่วนของการเลือกไฟล์เป็นดังนี้
 
<!doctype html>
<html>
<head>
    <meta charset="utf-8">
    <meta name="viewport" content="width=device-width, initial-scale=1, shrink-to-fit=no"> 
    <title>Document</title> 
    <link rel="stylesheet" href="https://unpkg.com/bootstrap@4.3.1/dist/css/bootstrap.min.css" >
</head>
<body>


<div class="container">
 <br>
<form id="myform1" name="form1" method="post" action="" class="needs-validation2" enctype="multipart/form-data" novalidate>
<div class="form-group row">
    <legend class="col-form-label col-sm-3 pt-0 text-right">ไฟล์อัพโหลด</legend>
    <div class="col col-5">   
        <div class="custom-file">
          <input type="file" class="custom-file-input" name="customFile" id="customFile" accept="image/*" required >
          <label class="custom-file-label" for="customFile">Choose file</label>          
            <div class="invalid-feedback">
            กรุณาเลือกไฟล์
            </div>                   
        </div>                         
    </div>
</div>
<div class="form-group row">
    <div class="col-sm-3 offset-sm-3 text-right pt-3">
         <button type="submit" name="btn_submit" id="btn_submit" value="1" class="btn btn-primary btn-block">ส่งข้อมูล</button>
    </div>
</div> 
</form> 
  
 </div>
  
        
<script src="https://unpkg.com/jquery@3.3.1/dist/jquery.min.js"></script>
<script src="https://unpkg.com/bootstrap@4.3.1/dist/js/bootstrap.min.js"></script>
<script type="text/javascript">
$(function(){
	
     $("#myform1").on("submit",function(){
         var form = $(this)[0];
        if (form.checkValidity() === false) {
          event.preventDefault();
          event.stopPropagation();
        }
        form.classList.add('was-validated');         
     });
	 
});
</script>
</body>
</html>
 
    ผลลัพธ์เมื่อไม่ได้ทำการเลือกไฟล์ ก่อนทำการส่งข้อมูล 


    เราดูในส่วนของ input file 
 
<input type="file" class="custom-file-input" name="customFile" id="customFile" accept="image/*" required >
<label class="custom-file-label" for="customFile">Choose file</label>          
<div class="invalid-feedback">
กรุณาเลือกไฟล์
</div>         
 
    ในส่วนของการกำหนด accept จะเป็นการกำหนดว่า ถ้า dialog หรือหน้าต่างเลือกไฟล์แสดงขึ้นมา ให้แสดงเฉพาะไฟล์ ที่เรากำหนด
อย่างข้างต้น เรากำหนดให้แสดงเฉพาะไฟล์ที่เป็นรูปภาพทั้งหมด อย่างไรก็ตาม ส่วนนี้ ไม่ได้เป็นการบังคับให้ผู้ใช้ต้องเลือกเฉพาะไฟล์รูป
เป็นเพียงทางเลือก หรือตัวช่วยให้ผู้ใช้เลือกประเภทของไฟล์ได้ถูกต้อง ตามที่เราต้องการ และสะดวกเท่านั้น  เพราะผู้ใช้สามารถที่จะเลือก
ให้แสดงไฟล์ทั้งหมดได้เหมือนเดิม และอาจเลือกไฟล์ที่เราไม่อนุญาตได้
 
 
    ตัวอย่างการกำหนด accept ต่างๆ 
    เพิ่มเติม MIME Types List ได้ที่ https://www.freeformatter.com/mime-types-list.html
 
<p>.PDF and .CSV</p>
<input type="file" accept=".pdf,.csv"  />  

<p>MY CUSTOM ONE</p>
<input type="file" accept="image/*,video/*,.pdf,.csv"  />  

<p>Show .xls, .xlsx, .csv files...</p>
<input type="file" accept=".csv, application/vnd.openxmlformats-officedocument.spreadsheetml.sheet, application/vnd.ms-excel"  />  

<p>Only show Excel (.xlsx) files...</p>
<input type="file" accept="application/vnd.openxmlformats-officedocument.spreadsheetml.sheet"  />  

<p>Only show Excel (.xls) files...</p>
<input type="file" accept="application/vnd.ms-excel"  />  

<p>Only show image files...</p>
<input type="file" accept="image/*"  />  

<p>Only show text files...</p>
<input type="file" accept="text/plain"  />  

<p>Only show html files...</p>
<input type="file" accept="text/html"  />  

<p>Only show video files...</p>
<input type="file" accept="video/*"  />  

<p>Only show audio files...</p>
<input type="file" accept="audio/*"  />  

<p>Only show .WAV files...</p>
<input type="file" accept=".wav"  />  

<p>Only show .PDF files...</p>
<input type="file" accept=".pdf"  />  
 
    สำหรับรูปแบบฟอร์มข้างต้น เราใช้ custom file input ของ bootstrap เมื่อเราเลือกไฟล์ จะไม่เห็นความแตกต่างใดๆ
เพราะส่วนของ ข้อความ "Choose file" เราจะต้องประยุกต์ เพื่อจะเปลี่ยนส่วนนี้ด้วย JavaScript หรือ jQuery เป็นดังนี้
 
<script type="text/javascript">
$(function(){
	
	$("#customFile").on("change",function(){
		var _fileName;
		if(window.FileReader && window.Blob) {
			// All the File APIs are supported.
			var files = $(this)[0].files;
			var _fileNameArr = [];
			for (var i = 0; i < files.length; i++) {
				_fileNameArr.push(files[i].name);
//				console.log("Filename: " + files[i].name);
//				console.log("Type: " + files[i].type);
//				console.log("Size: " + files[i].size + " bytes");
			}		
			_fileName = 	_fileNameArr.join(",");	
		}else{
			// File and Blob are not supported
			var _filePath = $(this).val();
			var _fileName = _filePath.split("\\");
			_fileName = _fileName.pop();						
		}	
		$(this).next("label").text(_fileName);	
	});
	
     $("#myform1").on("submit",function(){
         var form = $(this)[0];
        if (form.checkValidity() === false) {
          event.preventDefault();
          event.stopPropagation();
        }
        form.classList.add('was-validated');         
     });
});
</script>
 
 
    ผลลัพธ์เมื่อทำการเลือกไฟล์ ก่อนทำการส่งข้อมูล 


     ต่อไป เราลองเพิ่มเงื่อนไขการตรวจสอบข้อมูลในส่วนของไฟล์ ว่าต้องเป็นไฟล์ประเภทไหนบ้างที่อนุญาต และขนาดไฟล์ไม่เกินเท่าไหร่
เหล่านี้เป็นต้น ส่วนนี้ให้เราปรับฟอร์มเล็กน้อยดังนี้
 
<!doctype html>
<html>
<head>
    <meta charset="utf-8">
    <meta name="viewport" content="width=device-width, initial-scale=1, shrink-to-fit=no"> 
    <title>Document</title> 
    <link rel="stylesheet" href="https://unpkg.com/bootstrap@4.3.1/dist/css/bootstrap.min.css" >
</head>
<body>


<div class="container">
 <br>
<form id="myform1" name="form1" method="post" action="" class="needs-validation2" enctype="multipart/form-data" novalidate>
<div class="form-group row">
    <legend class="col-form-label col-sm-3 pt-0 text-right">ไฟล์อัพโหลด</legend>
    <div class="col col-5">   
        <div class="custom-file">
          <input type="file" class="custom-file-input" name="customFile" id="customFile"  required  >
          <label class="custom-file-label" for="customFile">Choose file</label>          
          <input type="text" id="_customFile" class="form-control d-none" value="" required>
            <div class="invalid-feedback">
            กรุณาเลือกไฟล์
            </div>                   
        </div>                         
    </div>
</div>
<div class="form-group row">
    <div class="col-sm-3 offset-sm-3 text-right pt-3">
         <button type="submit" name="btn_submit" id="btn_submit" value="1" class="btn btn-primary btn-block">ส่งข้อมูล</button>
    </div>
</div> 
</form> 
  
 </div>
  
        
<script src="https://unpkg.com/jquery@3.3.1/dist/jquery.min.js"></script>
<script src="https://unpkg.com/bootstrap@4.3.1/dist/js/bootstrap.min.js"></script>
<script type="text/javascript">
$(function(){
	
	$("#customFile").on("change",function(){
		var _fileName;
		var _maxFileSize = 2000000; // ไม่เกิน 2 MB
		var _allowFileType = ["application/pdf","image/jpeg"]; // กำหนดชนิดไฟลที่อนุญาต
		// กำหนดข้อความ อ้างอิงค่าจาก key index ของตัวแปร _statusFileCode
		var _waringTextValue = ["กรุณาเลือกไฟล์","ขนาดไฟล์ไม่เกิน 2 MB","อนุญาตเฉพาะไฟล์ PDF และ JPG"];
		
		if(window.FileReader && window.Blob) {
			// All the File APIs are supported.
			var files = $(this)[0].files;
			var _fileNameArr = [];
			var _statusFile = true;
			var _statusFileCode = 0;
			
			for (var i = 0; i < files.length; i++) {
				_fileNameArr.push(files[i].name);
				if(files[i].size > _maxFileSize){
					_statusFile = false;
					_statusFileCode = 1;
				}
				if($.inArray(files[i].type, _allowFileType) === -1 ){
					_statusFile = false;
					_statusFileCode = 2;
				}				
			}		
			_fileName = 	_fileNameArr.join(",");	
			if(_fileName==""){
				_statusFile = false;
			}
			// ส่วนของเงื่อนไข 
			if(_statusFile==false){ // ไม่ผ่านเงื่อนไข
				$("#_customFile").val("");
				$("#_customFile").next("div.invalid-feedback").text(_waringTextValue[_statusFileCode]);
			}else{ // ผ่านเงื่อนไข
				$("#_customFile").val("ok");
			}
		}else{
			var _filePath = $(this).val();
			var _fileName = _filePath.split("\\");
			_fileName = _fileName.pop();						
		}	
		$(this).next("label").text(_fileName);	
	});
	
     $("#myform1").on("submit",function(){
         var form = $(this)[0];
        if (form.checkValidity() === false) {
          event.preventDefault();
          event.stopPropagation();
        }
        form.classList.add('was-validated');         
     });
});
</script>
</body>
</html>
 
    ทดสอบเงื่อนไขต่างๆ ดูผลลัพธ์


กด Like หรือ Share เป็นกำลังใจ ให้มีบทความใหม่ๆ เรื่อยๆ น่ะครับ


เนื้อหาที่เกี่ยวข้อง


URL สำหรับอ้างอิง


เว็บไซต์ของเราให้บริการเนื้อหาบทความสำหรับนักพัฒนา โดยพึ่งพารายได้เล็กน้อยจากการแสดงโฆษณา โปรดสนับสนุนเว็บไซต์ของเราด้วยการปิดการใช้งานตัวปิดกั้นโฆษณา (Disable Ads Blocker) ขอบคุณครับ